The last parts left connected to the base plate are all related to the payout system. A word of caution before we proceed: As we remove the horizontal fingers and the payout slides, it’s important to keep them in order just like we did for the vertical fingers a few chapters ago. We’re going to try to remove the entire horizontal finger assembly as one unit, but if it becomes necessary to dismantle it I’m going to thread a piece of wire through the parts to keep them in order. The same thing goes for the payout slides.
Anyway, let’s get to work.
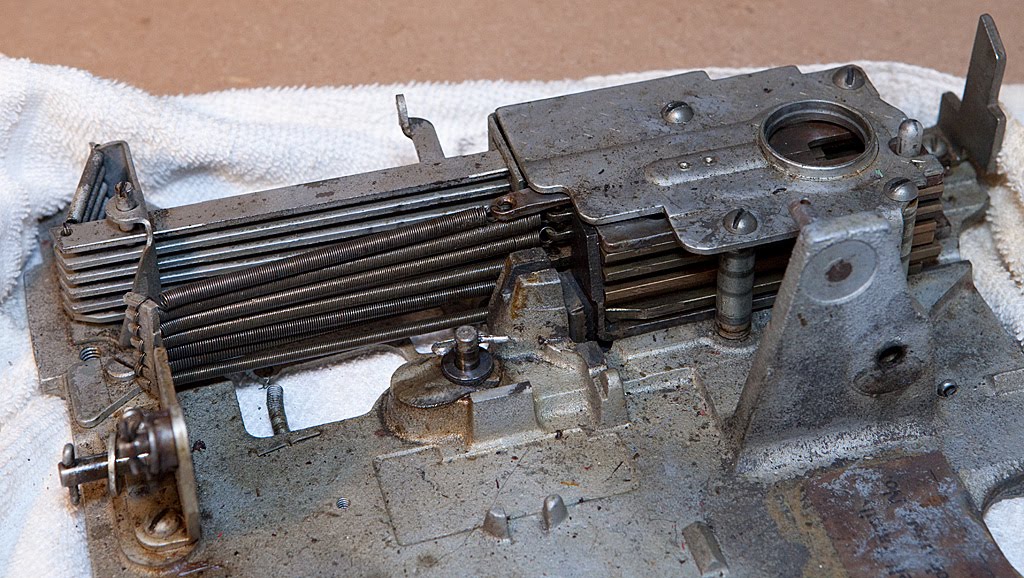
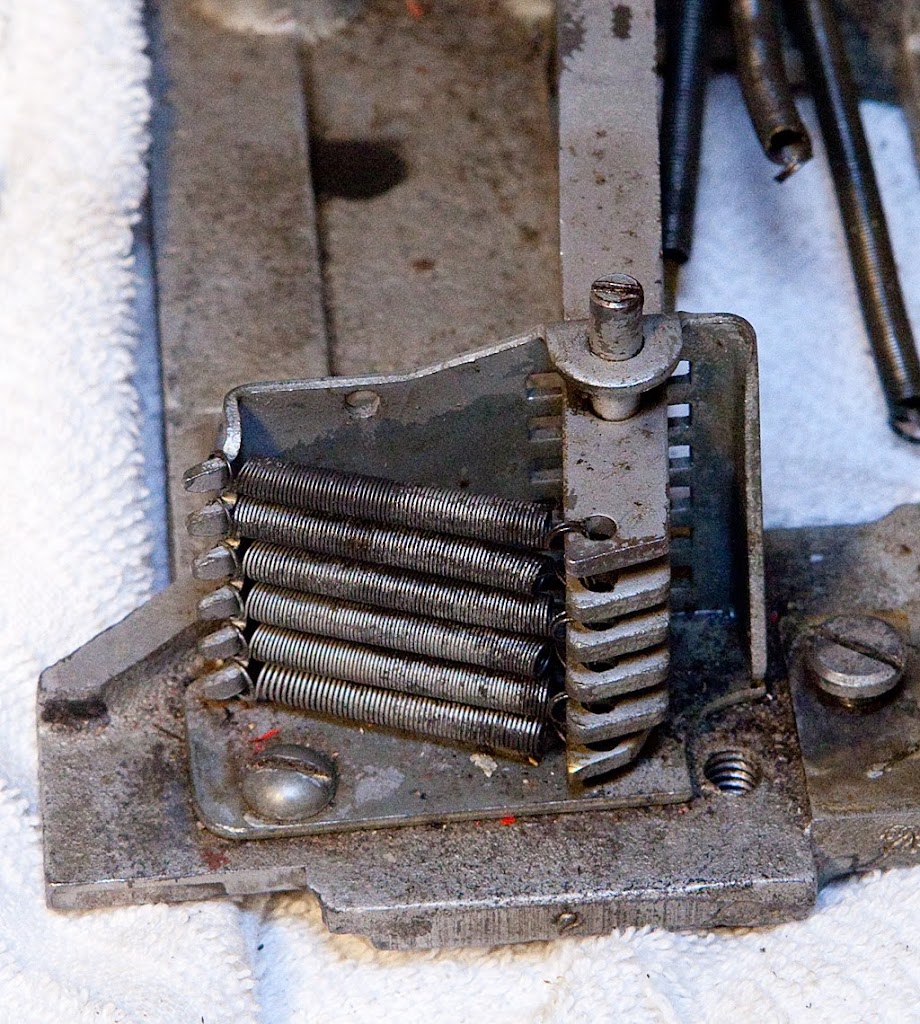
Here we see the horizontal fingers and the payout slides. We can go ahead and disconnect the large springs for the payout slides and the small springs for the horizontal payout levers at any time.
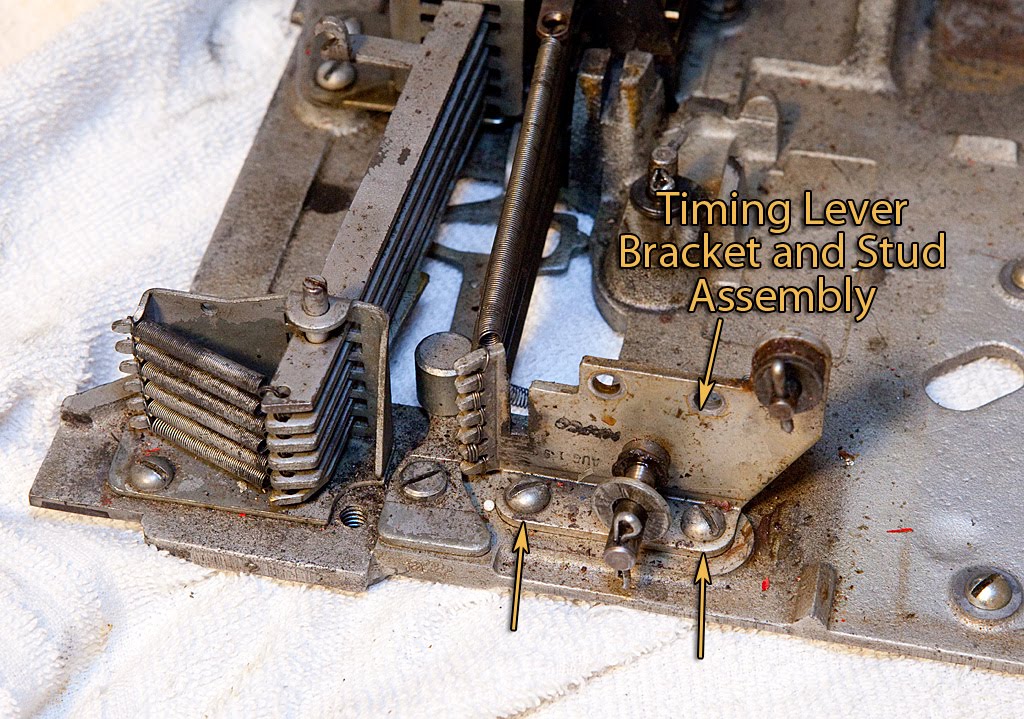
The photo above shows the first part we’ll be removing. Since the springs for the coin slides are connected to it, we need to go ahead and slip them off of the ears on the timing lever bracket. Once the springs are free, we can unscrew the two screws pointed out above to remove the part.
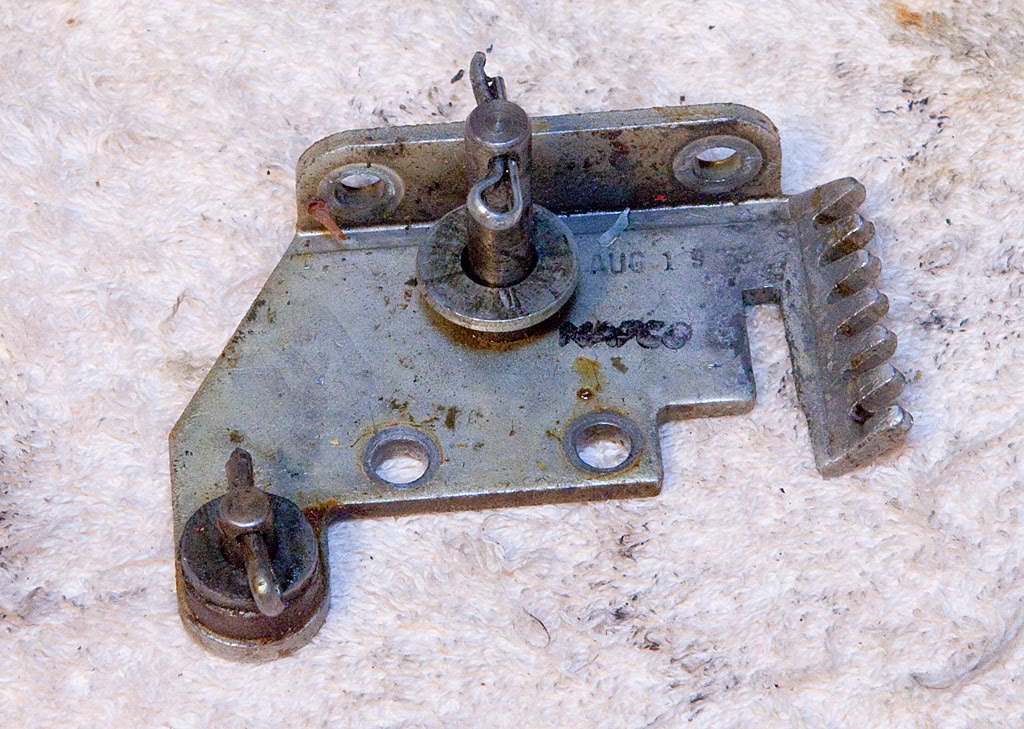
You’ll notice that there is a partial date printed on this particular piece, but that will not always be the case. Sometimes when you tear into an old machine you find bits of information like this, which is sometimes useful but often confusing.
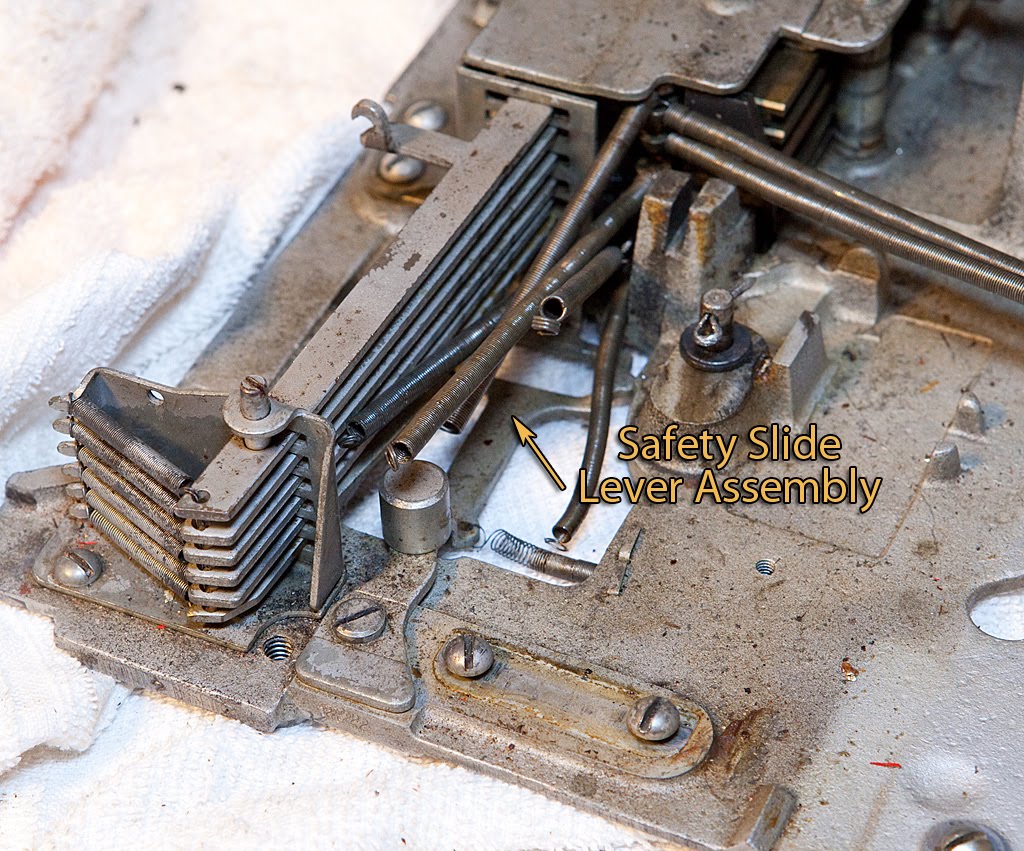
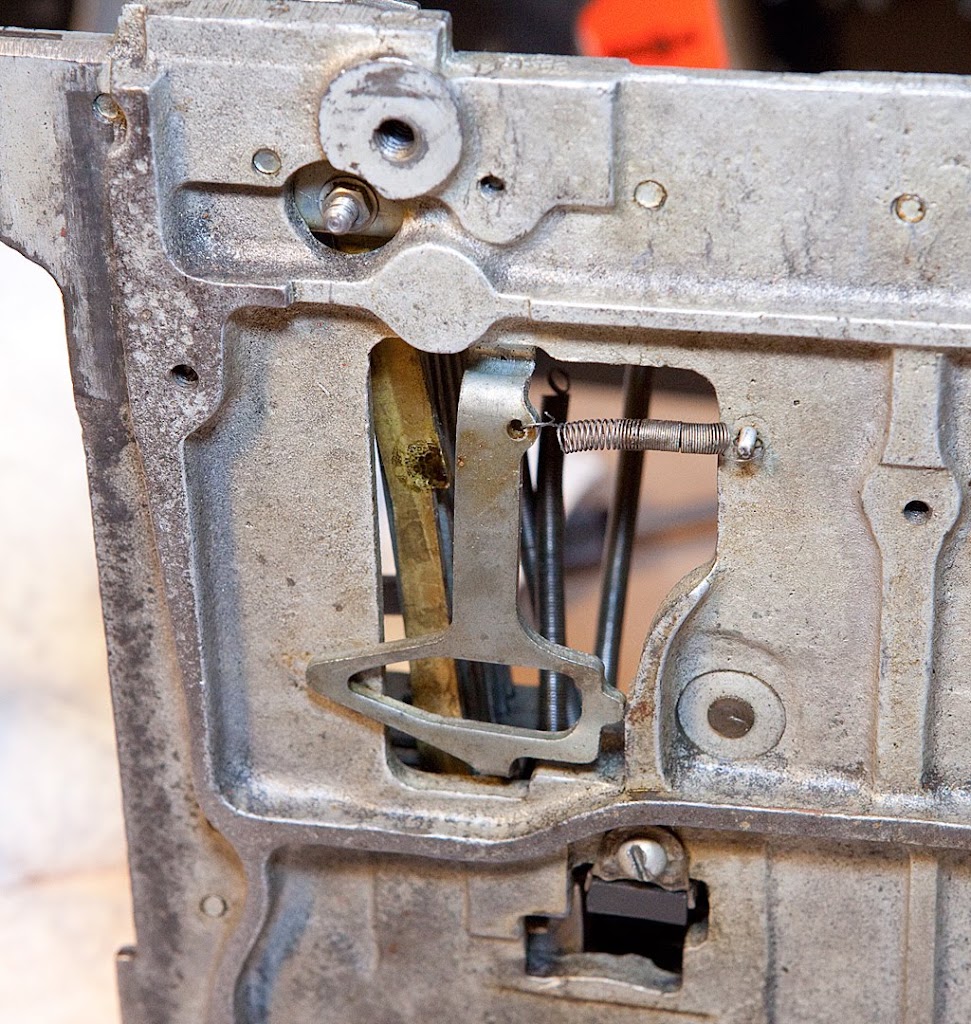
The part in the photo above can be removed at this point, although it is probably easier to wait until the coin slides are removed. I chose to remove it now, so that’s what the photos reflect. It’s secured by a shoulder screw visible in the photo above, plus a spring that is attached to the underside of the base plate.
The safety slide lever assembly is the closest thing an antique slot machine has to a pinball machine’s “tilt” mechanism. When we remove the payout slides you will be able to see the safety slide itself, which is really nothing more than a thin piece of metal with a hole in it. It its normal position, it allows coins to pass down through it and out of the mechanism into the payout chute. If the machine has been jarred during its cycle, however, the lever trips and the slide moves backwards to prevent coins from passing through.
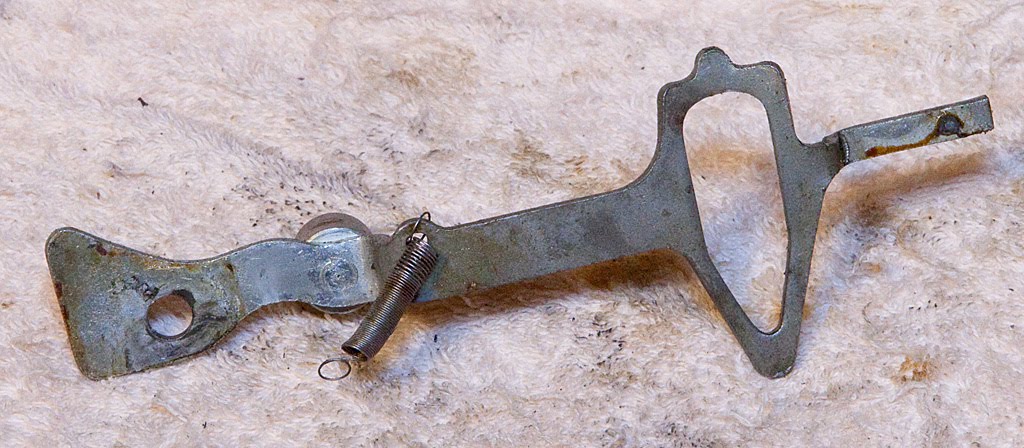
The entire safety slide/lever mechanism is sometimes called the “non-beating” mechanism for obvious reasons. Although these are relatively minor parts, they sometimes cause problems. If the small spring attached to the safety slide lever breaks or loses tension, or if the lever gets generally gummed up, the safety slide can travel backwards on every pull of the handle, preventing the machine from paying off. For this reason, if you have a machine that won’t pay off at all you should probably spend a bit of time checking to be sure that the lever travels freely and that the attached spring returns it to its proper position.
Here’s a view from underneath the base plate:
Once the shoulder screw is removed and the spring is disconnected the lever can be removed, although it takes a bit of maneuvering to get it out from under the coin slides. For this reason, you may want to leave it in place for now and remove it later.
Next, we’re going to remove the horizontal fingers and the related bracket as one piece if possible. If you haven’t already disconnected the springs shown below, go ahead and do it now.
In the photo above you can also see the screw-in shaft that secures all of the horizontal fingers, and it’s perfectly OK to take this shaft out and remove each finger individually. In fact, that may be easier all around. I’m going to leave the shaft in place for now, though, and try to remove the entire assembly at once.
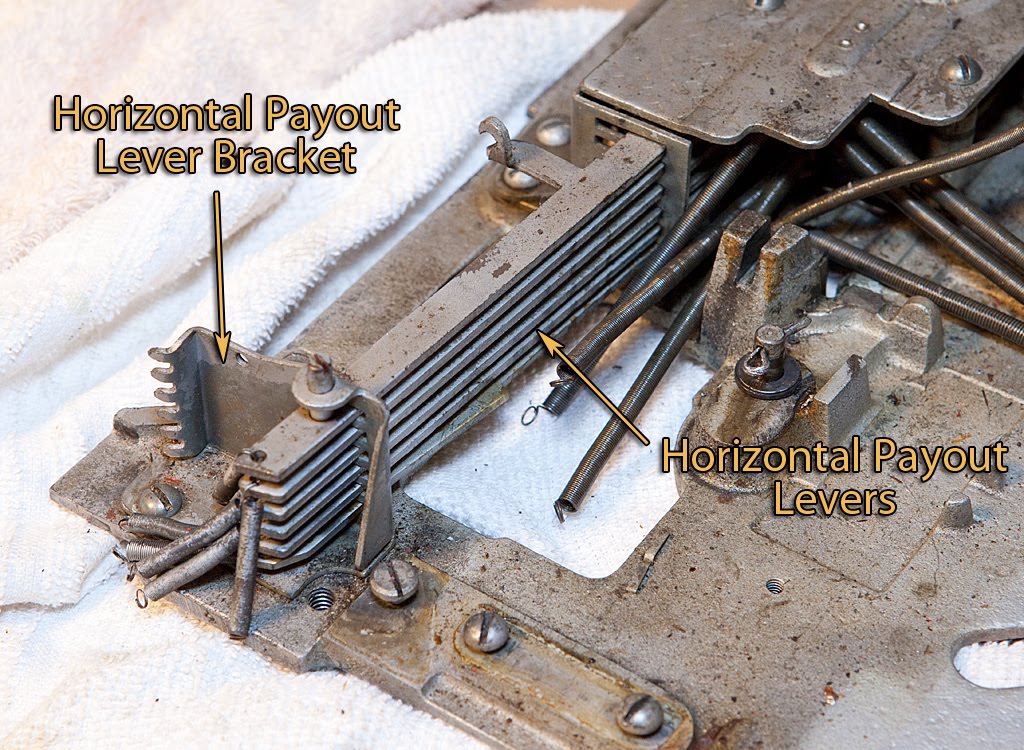
The horizontal payout lever braket is secured to the base plate with a couple of screws. Once they are removed, if you are trying to remove all the fingers one at a time or all at once, you will have to work them backwards GENTLY to get them out of the guide bracket up near the slides (seen near the top of the photo above.)
Sometimes there is a spacer underneath the horizontal payout lever bracket, so be sure to watch for it and replace it when you reassemble the machine.
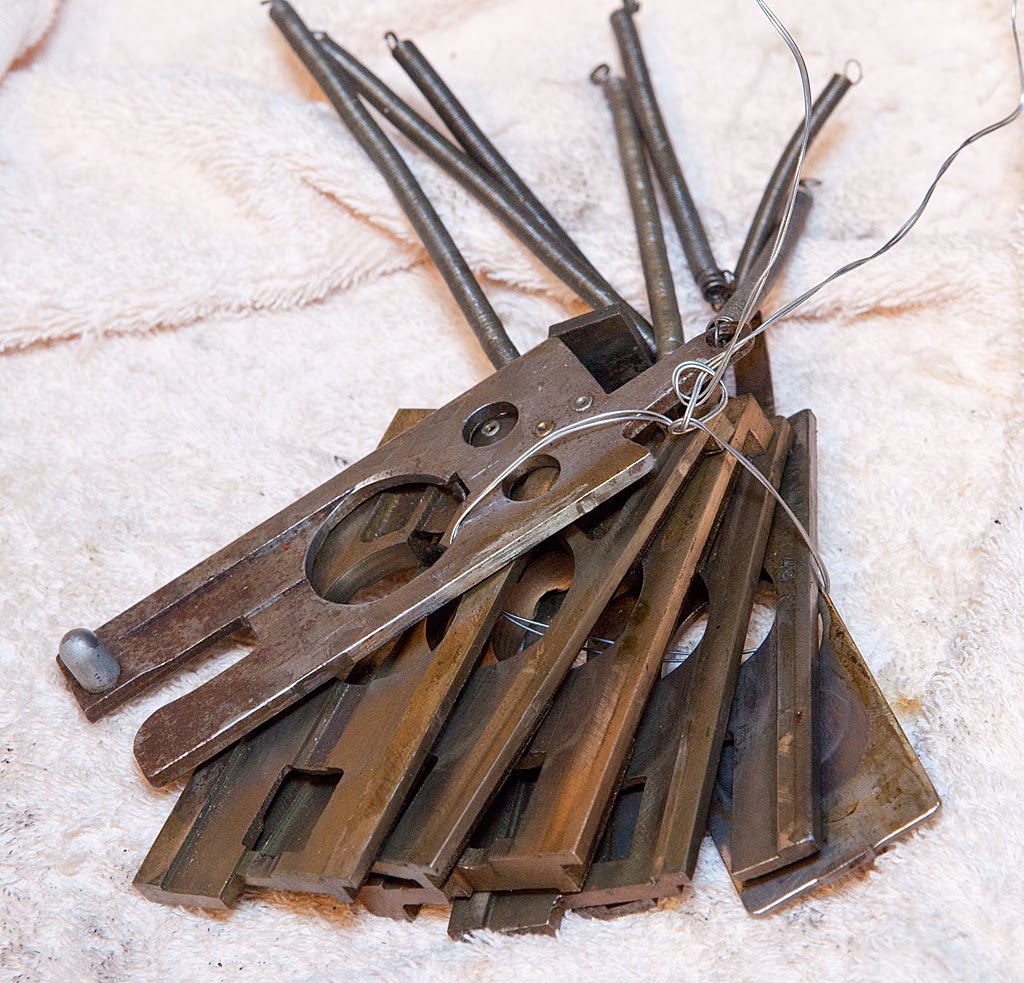
Let’s see what the assembly looks like once we have the assembly off the mech:
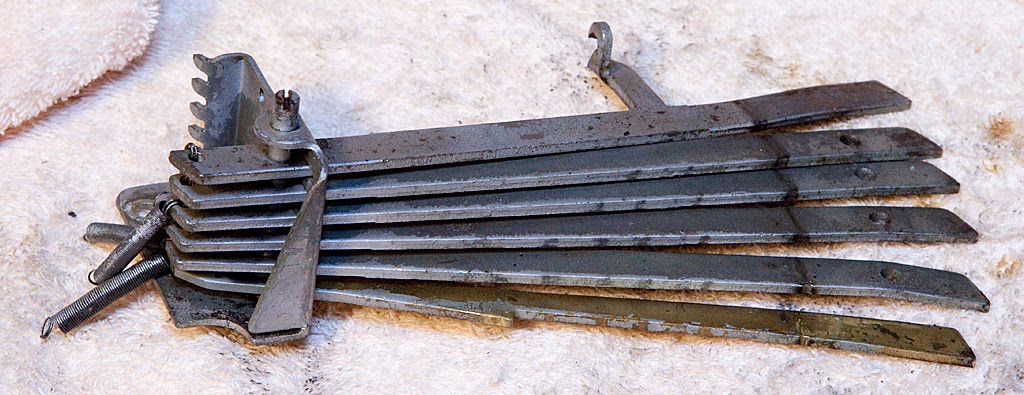
All of the fingers look the same, except for the very top one which has the hook for the spring that I destroyed earlier in the teardown (the jackpot finger), and the bottom one which has a protrusion on the front edge (the one-cherry finger.) Even though the middle four fingers are essentially identical, that doesn’t mean that you shouldn’t keep them in the same order when you reassemble the machine. Parts wear together over the decades, and changing them around can sometimes cause you problems.
You may also notice in the above photo that some of the fingers are bent a bit on the right-hand side. If you encounter parts that are bent inside of an antique slot machine, your first instinct may be to straighten them out immediately. This isn’t always a good idea. Bending was a common and accepted adjustment in most antique slot machines. Until you are certain that a bend is causing you problems, you should probably leave it alone. There’s a good chance that someone who knew more about slot machines that you do put the bend in the part intentionally a long time ago, and you don’t want to inadvertently undo their good work.
Anyway, back to the mech:
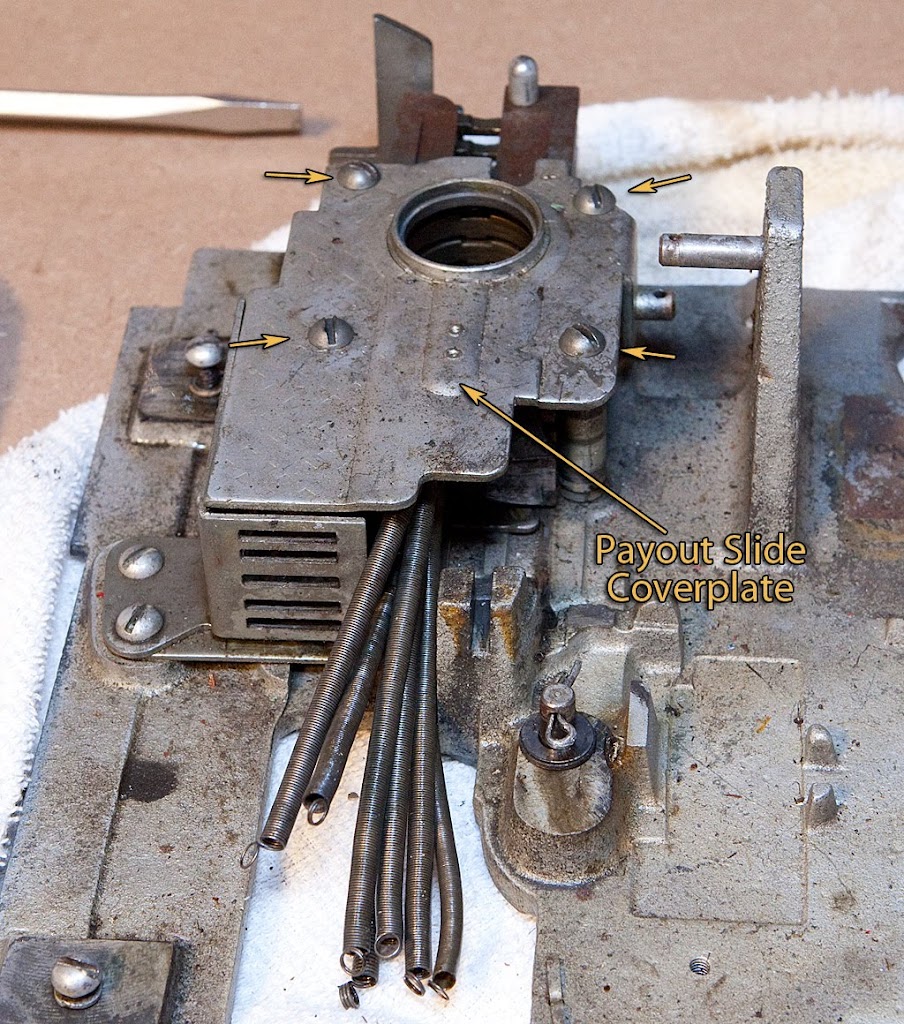
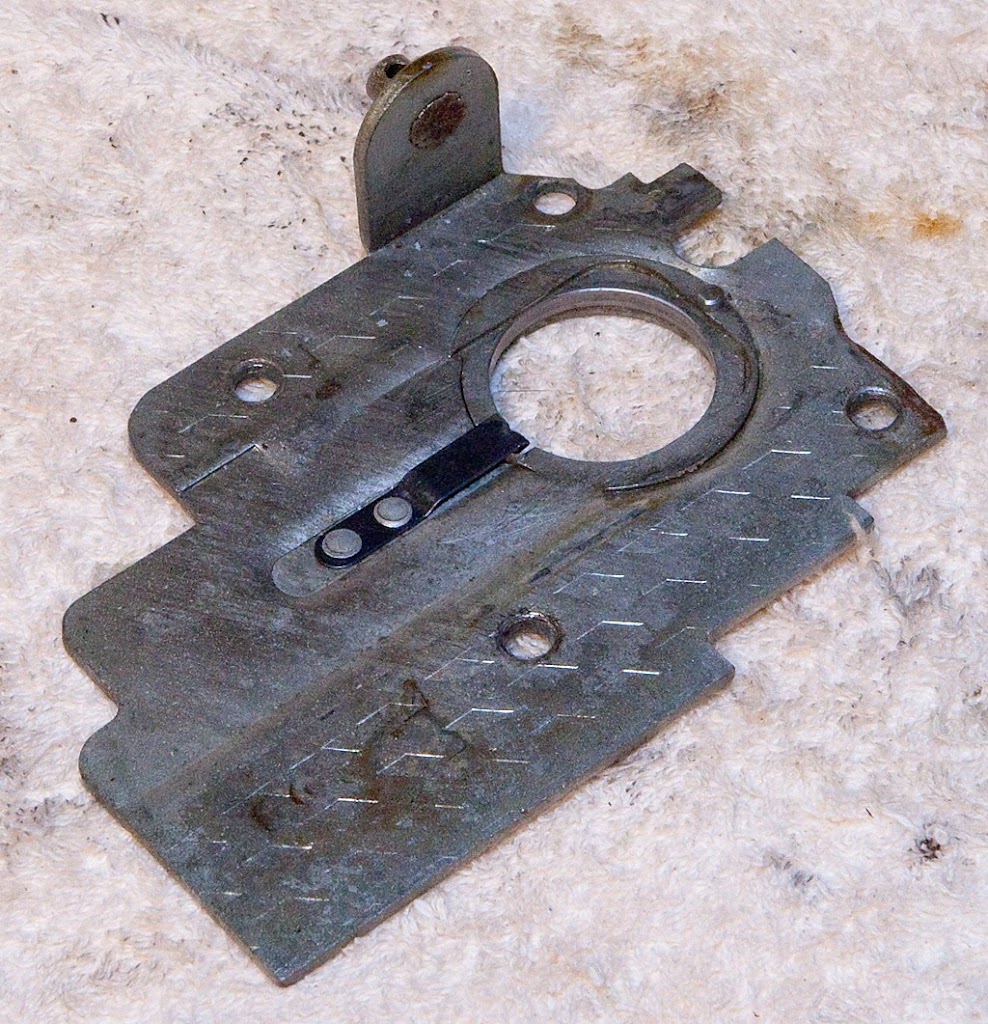
Four screws secure the payout slide coverplate. Here’s what the underside looks like once it has been removed from the mech:
With the cover removed, we can finally see the coin slides themselves:
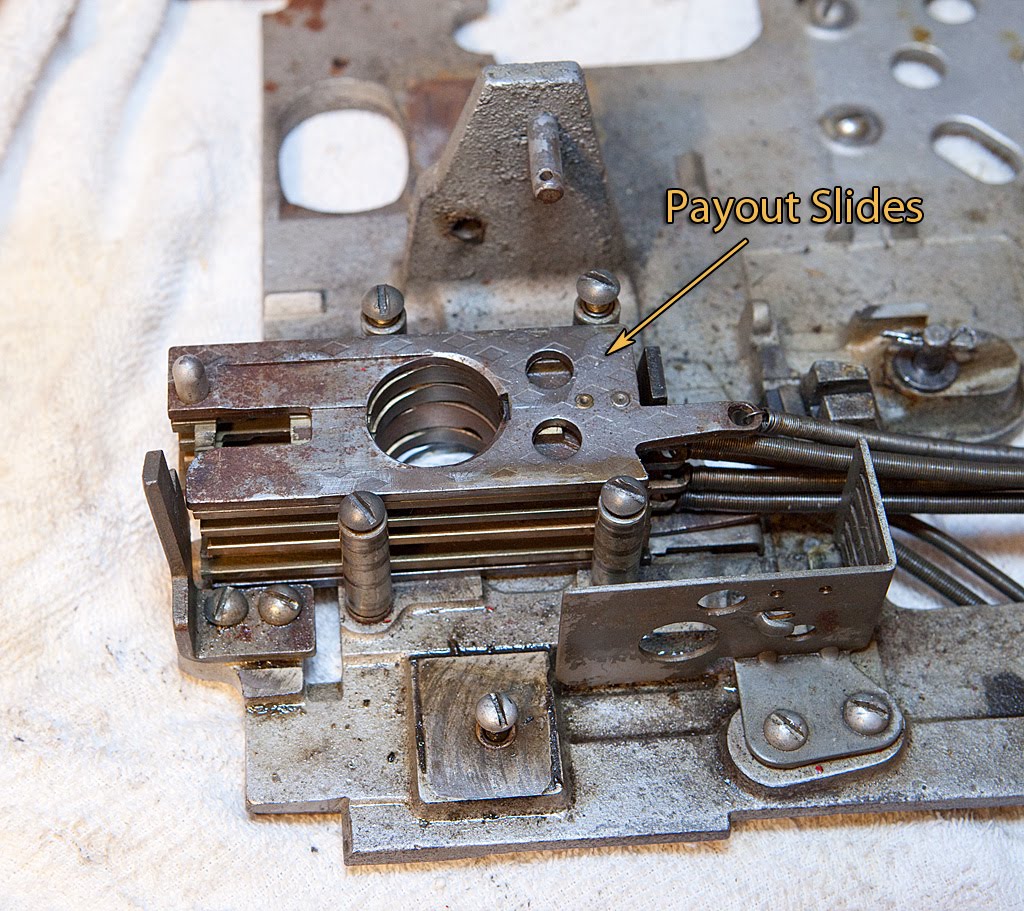
At this point, the slides are not secured to the mech by anything, and can be lifted straight up. Be sure to keep them in order!
Notice that I’ve tied the slides together with a piece of wire to keep their order straight. Remember our discussion regarding the number of coins held in each slide? Here’s a visual:

We’ve only got a few parts left to remove, and they are all secured with basic screws.
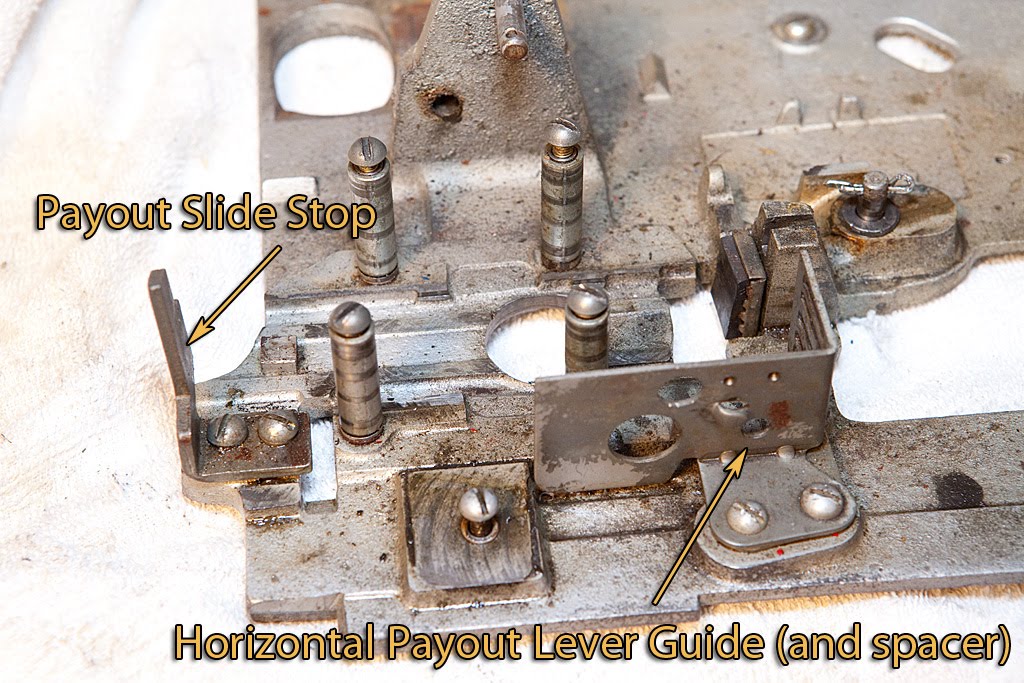

Don’t misplace the spacer shown above. Without it installed, the horizontal fingers will bind in the guide and not work properly.

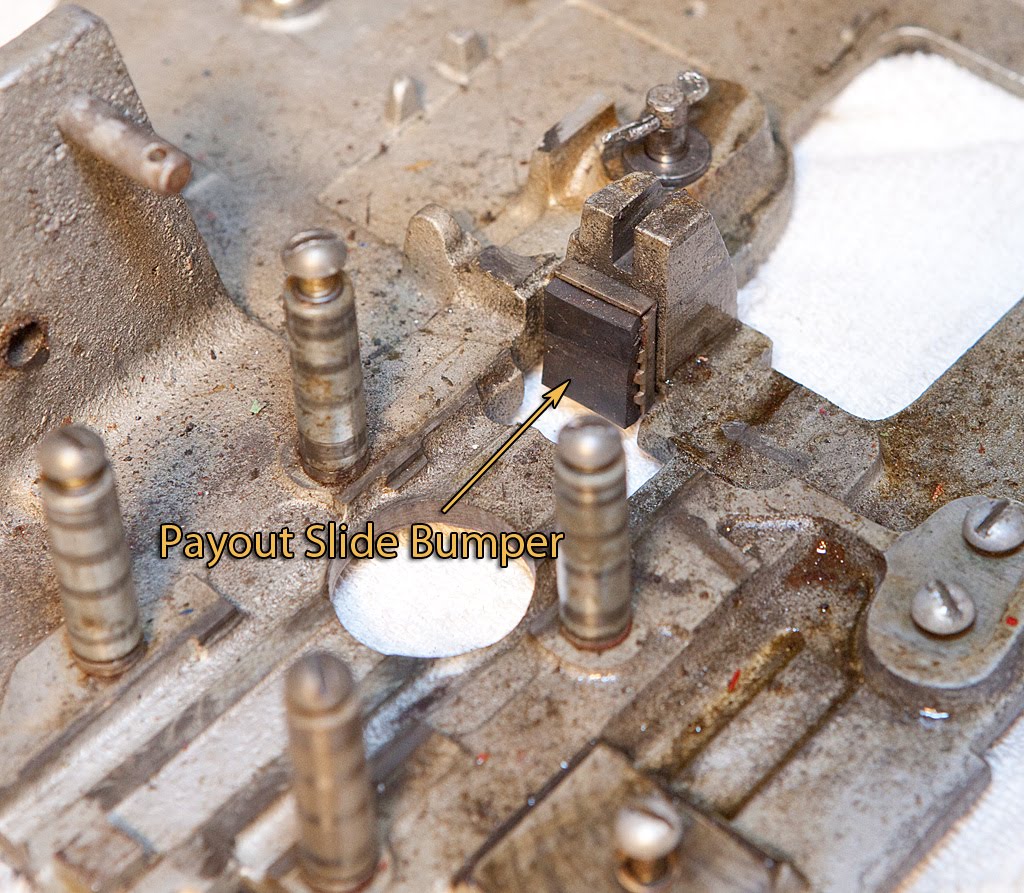
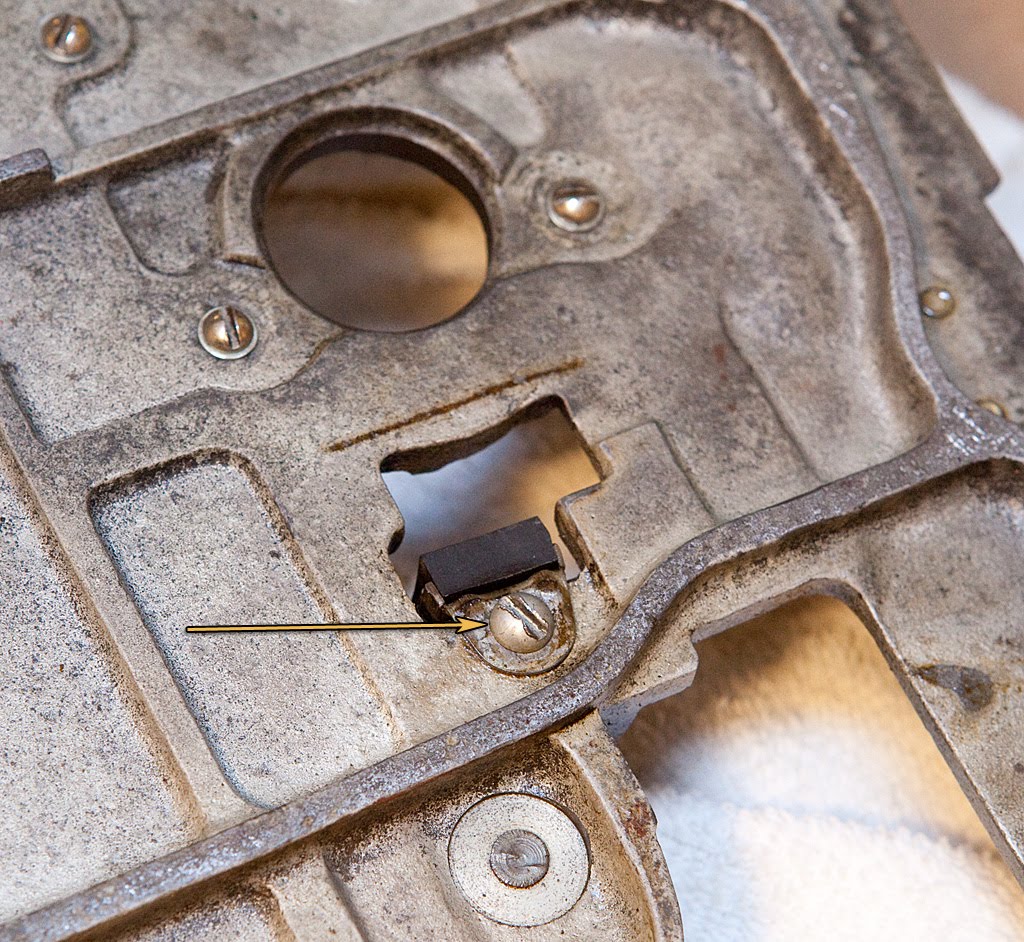
We’ve got another bumper that needs to be removed. This one stops the payout slides at the back, making sure that their holes line up over the circular hole in the base plate that leads to the payout chute.
It’s secured on the underside of the base plate with a screw.
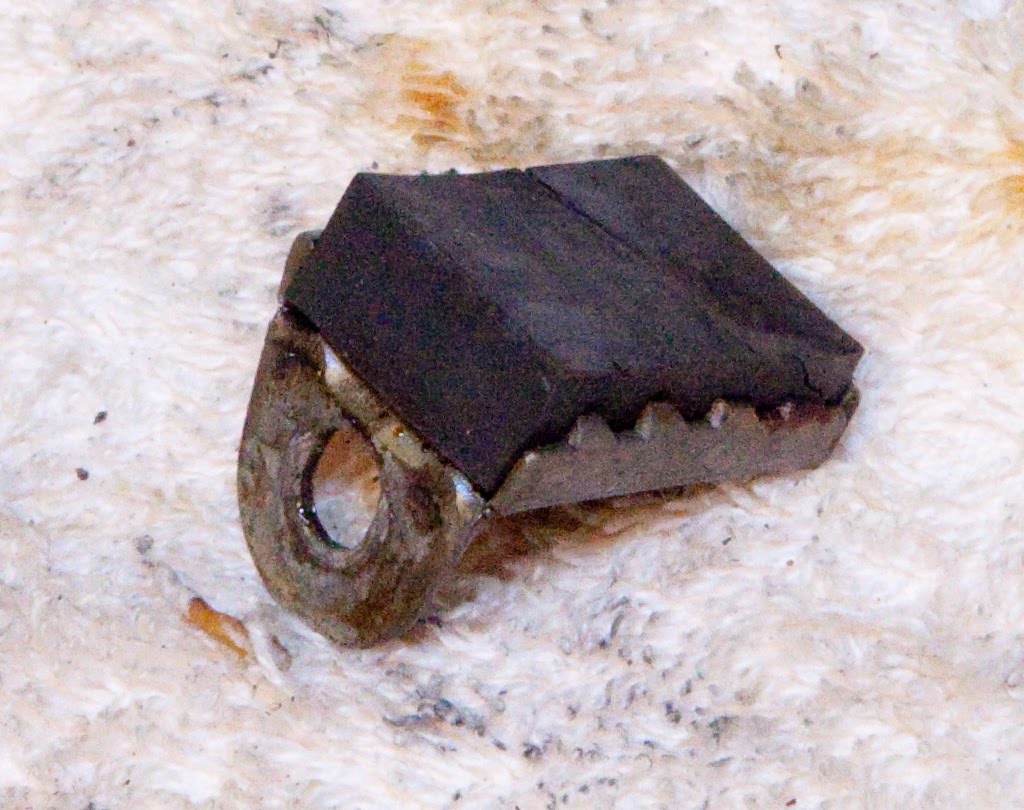
This bumper is in better shape than the others we’ve seen, but it’s hard as a rock and will probably also need to be replaced.
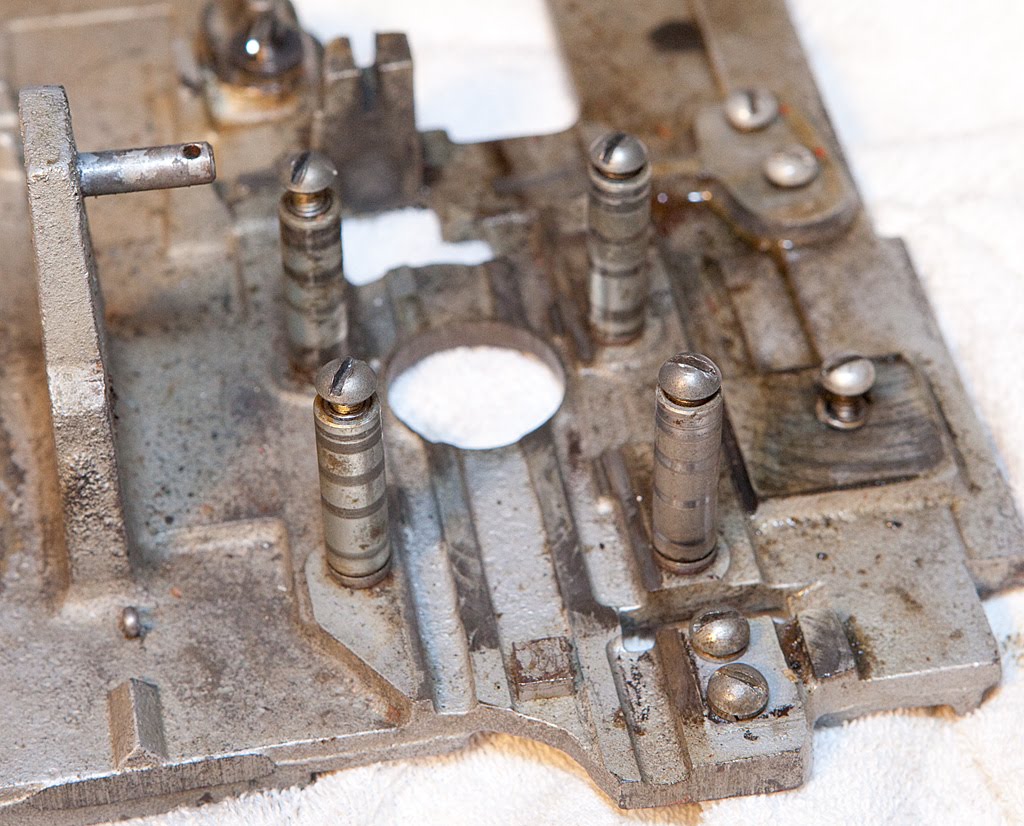
There are four posts that held the payout slide coverplate that could be removed from the base plate now, but in general it’s not necessary to remove them unless you are doing something extreme to the base plate. I’m going to leave them in place for now.
Believe it or not, that’s it! We’ll have some minor disassembly to do as we clean the various parts of the mechanism, but we’re done with the mech for now. Check it out:

Hi,
Just wanted to thank you for all the information on this web page. I received a Mill Black Cherry Machine from my older brother about 15 years ago. I decided in June 2010 to finally restore it. I had Nations Attic do the metal work but I finished the wood and cleaned the mechanism. It seems to work great, just wish I would have had this information before I started. I would say that the info you are providing is as good, if not better than what is available thru Meade..
Thanks, Blair
Thanks so much, Blair. I’ve had a good time putting the site together and can’t wait to get deeper into the restoration.
In all fairness, though, I couldn’t have undertaken this sort of project without all of the information I’ve learned from the various Mead publications. No one reference work will ever be enough, of course.
Thanks again for the kind words, and I hope the Black Cherry gives you many years of enjoyment!
anyway, I agree with the meade comment even though your instructions with the great pictures make the difference.. so i have decided to take the mechanism down fully as you describe it..
blair
that’s a good guide I have a ? on the top cover of the payout slide I notice a small peice of wire that was connected to the top cover and in that guide demo U wrote there was no mention of that wire hope U enlightened me with an answer
thanks
les
I’m not sure what piece of wire you are talking about. Is it visible in the photos above, or is this something you are seeing on your own machine?
Great site!!!!!!
Question, is there an easy way to clean the payout slides without a complete tear down of the mech?
Thanks,
Joe
What you’ve done here is fantastic. I have a Mills Goosneck Front Vendor that I had no idea what to do with until you began your project and now my machine is seeing new life. One problem that I have is that someone in the distant past took out the payout slides. They were all left loose in the coin box and I think they’re all there but I have no idea about their order when I reassemble. Any suggestions? Thanks a million.
John, thanks for writing. The illustration above should give you some of the information you need regarding the order. Check the payout card of your particular machine and see how many coins are paid on the smallest payout possible. Find the slide(s) that hold that many coins (stack up some coins in the slide if you are unsure) and rest assured that one of those slides goes on the bottom. Then, find the next smallest payout and subtract the number of coins you already used above to get the size of the next slide. Essentially, if the two smallest payouts of your machine and 2 and 5 coins, respectively, then the very bottom slide will hold 2 coins, and the one on top of it will hold 3. When the machine pays out two coins, only the bottom slide will move. When it pays out five coins, both of these slides will move.
From there you just keep stepping up the payouts. For example, if your machine’s payouts are (in ascending order) 2, 5, 10, 14, 18, and 20 coins (plus the jackpot on this last one) then your payout slides would hold the following number of coins from bottom to top: 2, 3, 5, 4, 4, 2. If you start with the bottom slide and start adding the number of coins that each slide holds, you’ll see that you end up hitting each of the possible payouts.
Does that makes sense?
You may also find the section on the vertical payout fingers helpful as well: http://www.slotrestoration.com/2010/01/25/vertical-payout-fingers-and-related-parts/
Yes. Thanks so much.
I went through the process that you described and I can now match the payouts with the order of the slides. The only problem I have now is that what appears to be the safety slide doesn’t seem to fit under the cover with all of the other slides. The others when stacked and in order slide into the payout slide housing with no problem but I can’t fit in the safety slide. It appears from your photos that the safety slide is supposed to be on the bottom of the stack. Is that correct? Any thoughts about why it won’t fit? Also, where does the spring that is attached to the safety slide hook? Once again, thanks for the help.
The safety slide definitely goes on the bottom. The spring should attach the same place as the other payout slides… the timing level bracket and stud assembly. It is pictured above and should be pretty evident when you get in there.
This site is great, and very helpful !
I have a Mills Hightop 5 cent Cherry Bell with a special award “777″ $10.00 and $5.00 for 3 Nugget bars. In addition it has “Mystery Payouts?” listed on the payout schedule plate.
Everything seems to work great except it will payout coins & coin quantities randomly for various real symbols that line up across the center line, even if they are not listed on the payout schedule. This happens too often for me to believe it is normal. It always pays out when the symbols match the payout schedule.
Is there a way for me to reset the machine so that it pays out correctly for both the number of coins and corresponding payout schedule?
Your help with this issue will be greatly appreciated.
Thanks
Frank Ambra
Frank, thanks for writing. I’d suggest that you read the following two posts in detail:
http://www.slotrestoration.com/2010/01/22/the-reel-assembly-in-situ/
http://www.slotrestoration.com/2010/01/23/reel-bundle-removal/
It’s important that you understand the way that the payout fingers and the reel discs interact to cause a payout. I hear people complain about two “random” payout situations: First, that the machine doesn’t pay when it should, and second that the machine pays out when it shouldn’t.
The first situation can be caused by a variety of problems, including incorrect reel discs/reel strips, stuck payout slides, broken springs, etc.
The second situation (which is what you are encountering) is very frequently caused by a mismatch between the discs and the reel strips. Once you understand how to find the reel strip symbols that correspond with specific places on the discs, it’s a simple matter to determine if there is a mismatch.
Now, the whole “mystery payout” situation gives us a certain amount of leeway here, and it’s really up to you whether the level of mystery payouts is acceptable or not. Originally, the mystery payouts were caused (intentionally) by a specific position on one of the reel strips (let’s say an orange) having more than one hole punched in the corresponding position on the disc, usually adding a hole in the “bar” position. Often this was done on the third reel, meaning that combinations like “plum-plum-orange” would pay, since the machine treated that combination as “plum-plum-bar”.
Over the years I’ve seen some machines that were downright crazy on the mystery payouts, and other machines where the reel strips and the discs were just simply mismatched.
If the extra payouts bother you, there are a few routes you can take:
1. Replace the reel strips. This can be tough to determine, since you’ll need to inventory each payout disc, recording the position of the holes and determining the correct symbol for each position on each reel. Then you’ll have to locate appropriate replacement strips. The installation is very straightforward, however.
2. Replace the discs. This installation is a little more involved, but it’s still not a particularly tough undertaking. You’ll have to inventory your reel strips and then draw yourself a diagram of what the correct reel discs will look like, or you can sometimes find a designation for the reel strip on the strip itself (something like “CC-118-2″) and that may assist you in finding an appropriate disc.
3. Replace both the discs and the strips. Find a matching set that you like, and just replace it all.
4. Plug the extraneous holes in the discs. Once you locate the holes that are causing the incorrect payouts, it is possible to plug those holes. You might check with Squires and Corrie (http://squiresandcorrie.com) to see if they can help… they have come up with some obscure parts for me in the past.
5. Live with it and embrace the concept of “mystery payouts”. This may be your best option. Home slot machines that pay out frequently are more fun anyway.
Thanks so much for your detailed and quick response, I really appreciate it.
Now that I read your suggestions, one thing I realize I neglected to mention was, that when I first obtained the slot machine, everything seemed to be working perfectly. The machine payed out correctly per the payout schedule, both in symbols and their associated coin quantities. Occasionally I would get a payout that did not match the payout schedule, and I attributed that to a “Mystery Payout”. As a result, I’m inclined to believe that the discs and reels are matched correctly, or at least they worked in an acceptable manner, and that something changed in the course of playing the machine over the last 1+ years.
Going Forward
I will follow your suggestions to learn more about how the payout fingers, reels, and discs interact to cause a payout Then I will investigate/characterize my payout fingers, reels, and discs to determine exactly what I have, and how they line up. At that point I will either have fixed the problem or have some more questions to ask.
Now that you know the machine, at one time, worked in an acceptable manner, you may have some additional suggestions that I will gladly add to my list of things to do.
Thanks for you help,
Frank Ambra
thank you very much for your program how to restore these old slot machine , I have two of them one took my money and would not pay out i took this thing apart 5 times today, then i came across your site and one of your steps was the safety slide lever well it didn’t have a spring, i put one in and now it pays out thank you Gary from upstate NY
Hey Slotter….
Are you still responding to this great forum? It’s already 2014 and I notice that there have not been any new posts for about 1 1/2 years. Do you have a source for springs? Thanks again. Barry