There are a number of books out there available to the slot machine collector, and they all have something different to offer. I’ve already discussed some of the reference books that are useful for identifying the make and model of an antique slot, but now that we’ve identified our “21″ Bell, we’re more interested in books that will help us with the mechanics of the machine itself. Two of the aforementioned books are useful in this regard as well.
First and foremost, a copy of Owners Pictorial Guide for the Care and Understanding of the Mills Bell Slot Machine is pretty much required. It’s a good book with plenty of pictures and a good explanation of the operating mechanism and some of the additional features that some of the Mills machines incorporated over the years.
Next, Slot Machines of Yesteryear: Operator’s Companion -Mills of the Forties is also good to have on hand, particularly for its parts diagrams and lists of Mills part numbers.
Original Mills literature comes up for sale from time to time, and there are other books available, but the two books mentioned above are a good place to start.
Also, there is a set of videos available from Dave at Ibuyoldslots.com. This series of DVDs has a wealth of information and is well worth the money. Even though the production values are not Hollywood quality, the content is still invaluable to anyone wanting to do a complete disassembly and reassembly of a vintage slot machine. I wish I’d had it twenty years ago.
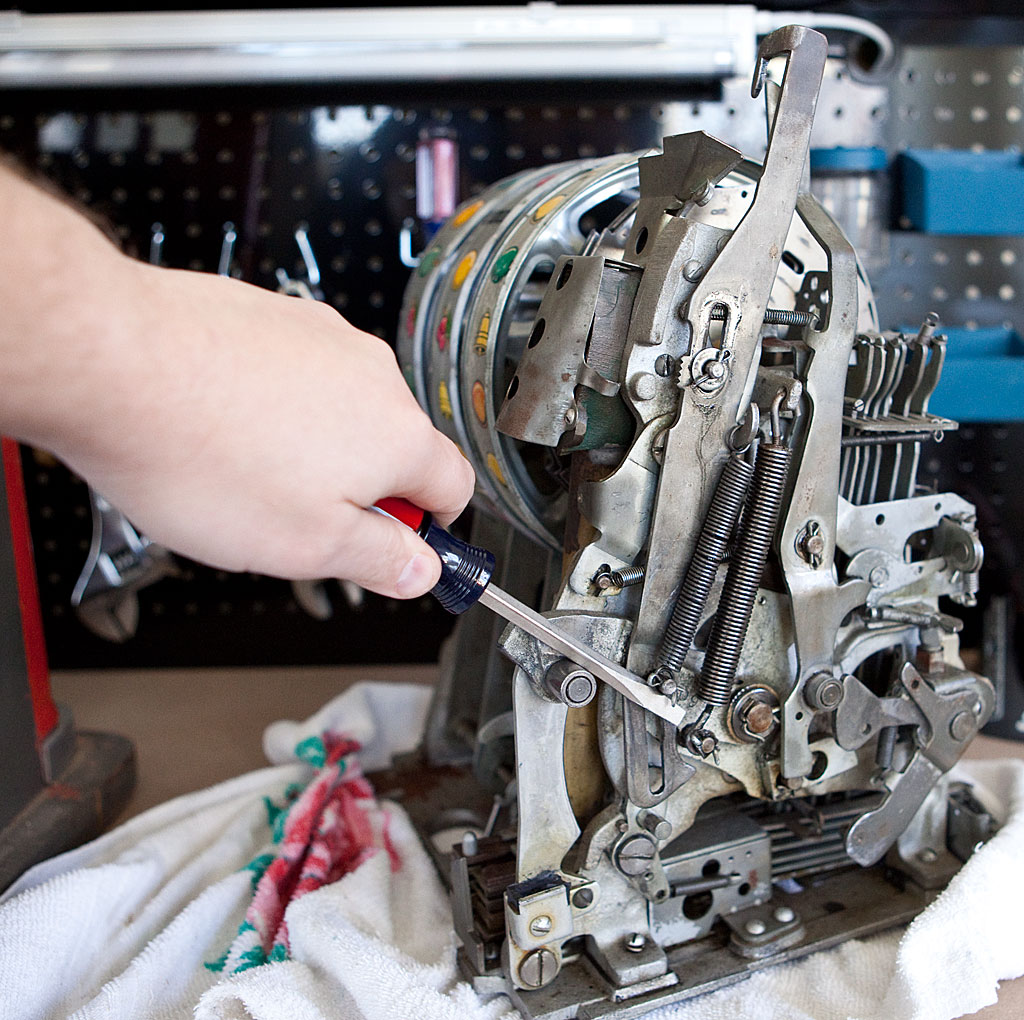
If you are new to slot machine restoration, there are a few things that you will need to consider before you get started. Reference books and/or videos are important, even if you are an experienced do-it-yourselfer. Likewise, a good set of basic tools is also a necessity. I’ll talk more about both of those things later. Today, however, I want to talk about a very basic skill, a neat tool, and a really handy part that is often missing from antique slot machines. Whenever you work on a machine, you will undoubtedly need to take the mechanism through its play cycle while the machine is outside of the case. This is an easy thing to do, but a bit nerve wracking the first time you do it unless you’ve had someone show you how. All you really need to cycle the mech is a screwdriver. It is placed like this:
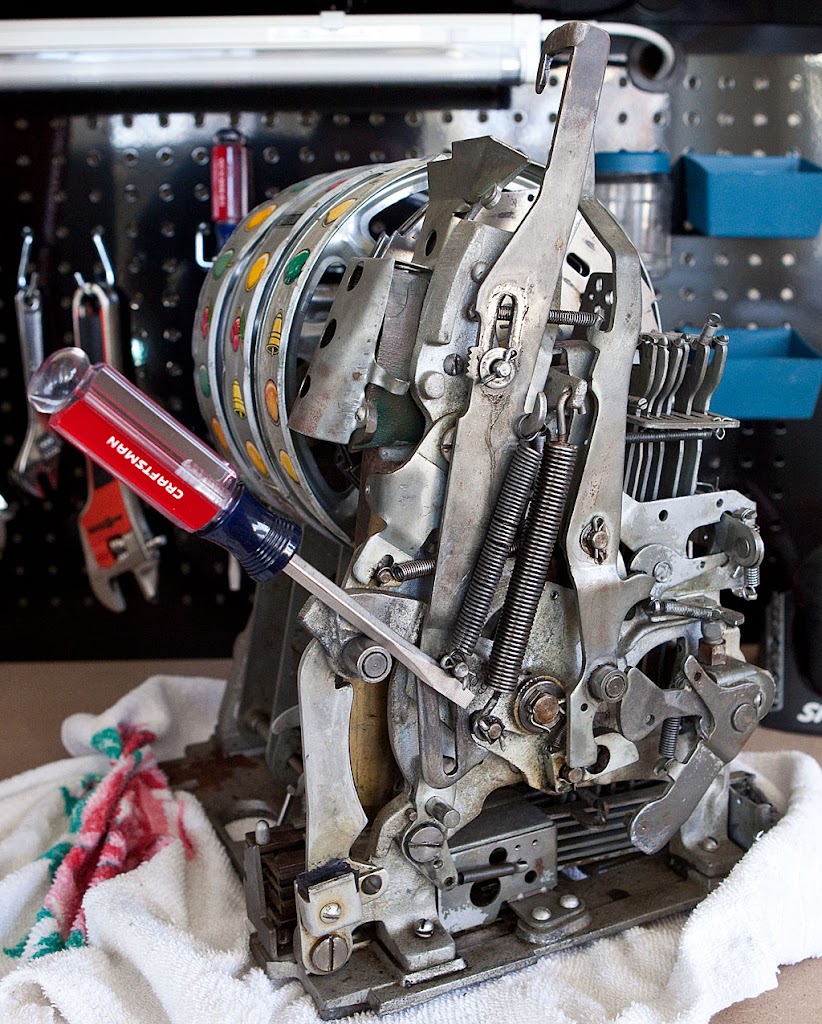
Although the screwdriver works just fine, inevitably I end up needing that screwdriver for other things and am constantly misplacing it. Bernie Berten (mrslot1@aol.com… email for a catalog) makes a neat little tool, though, that I bought a while back. Check this out:
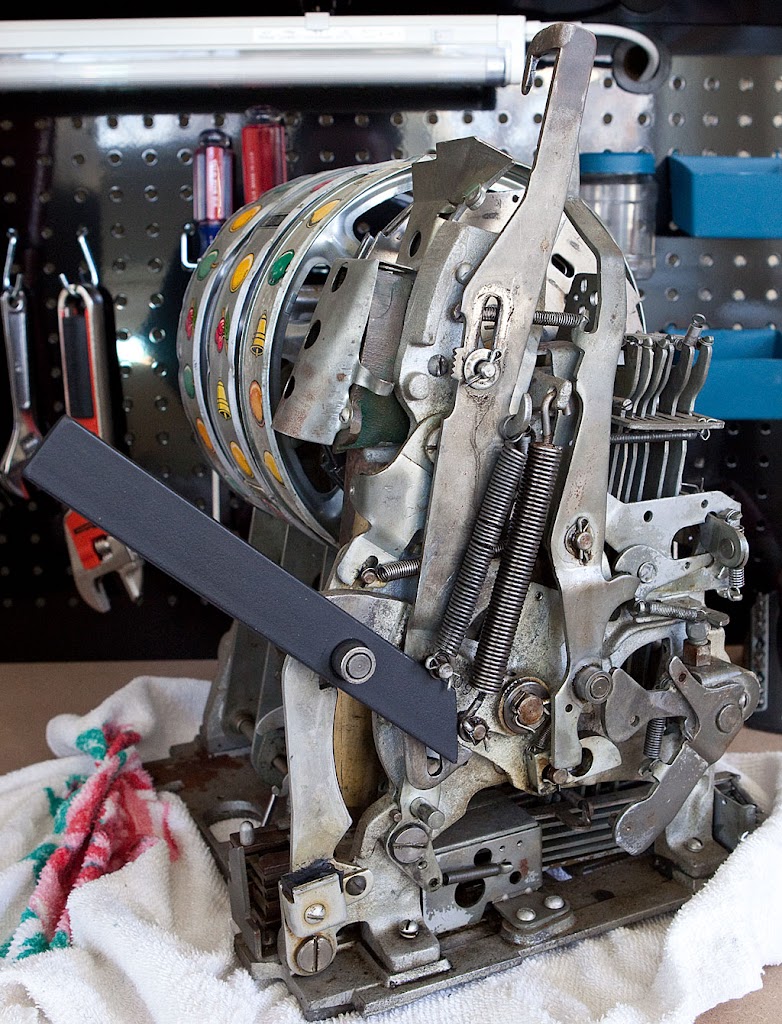
I keep this hanging on my peg board, and it’s always ready to cycle the mech. It’s a simple thing, and I could have made one for myself if I’d thought about it, but buying one was easier and it cost less than $20. Anyway, using either a screwdriver or one of the special tools, you need to do two things in order to cycle the mech. If you just pull down on the screwdriver to simulate a handle pull, you will notice that the coin detection and check detection arms at the top of the mech start to move forward. This makes the machine think (if think is the right word) that no coin has been deposited, and the handle will stop before the mech has been cycled. To get around this, hold back on the coin detection and check detection arms with your thumb:
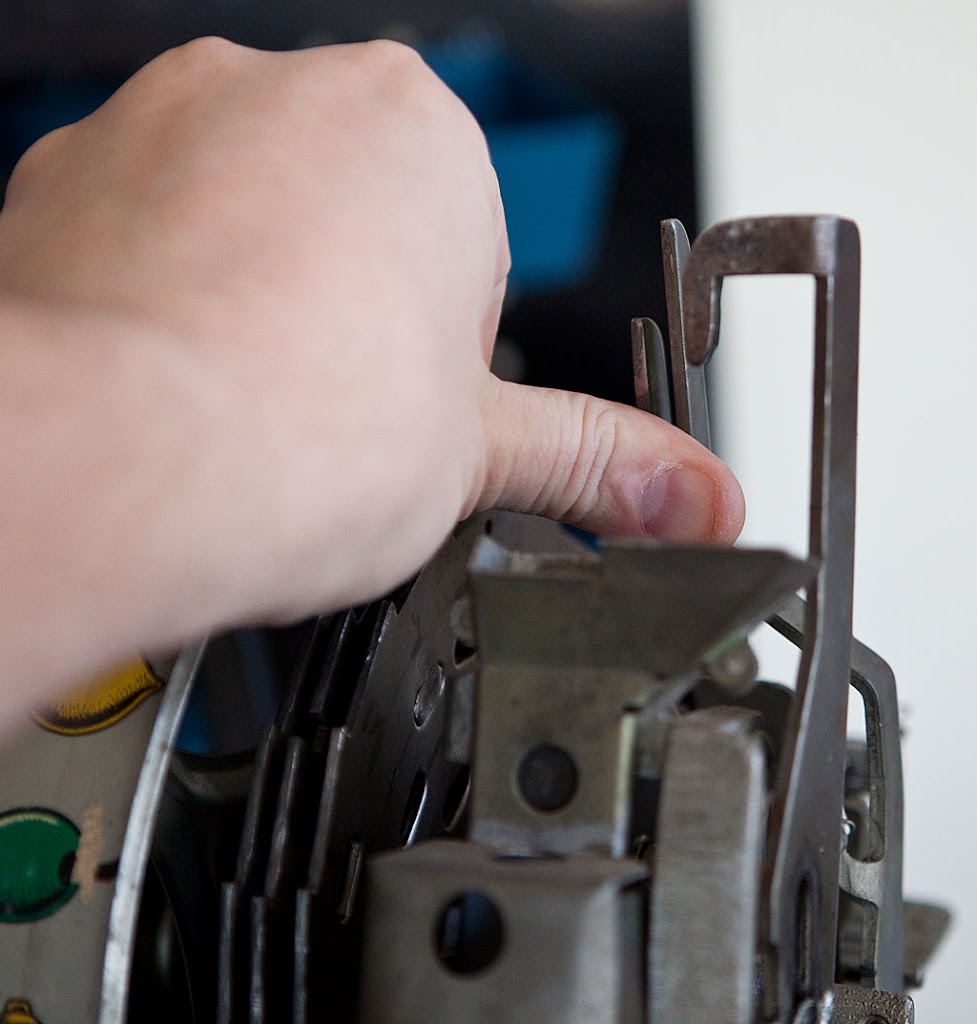
Now, the machine thinks that a coin has been inserted. Pull down on the handle (while continuing to hold back the coin detect and check detect levers, which is not show below) and the mech should start its play cycle.
It isn’t strictly necessary to hold back the check detection arm in order to just cycle the mech, but it is necessary if you are wanting to check the operation of the payout system. If the coin detection arm is held back but the check detection arm is allowed to move, the mechanism will think that you have inserted a check (a token with a hole in the middle) instead of a coin, and it will cycle but inhibit the operation of the payout cycle. I generally hold back both levers, which is a good habit.
When diagnosing problems or disassembling the mechanism it is frequently necessary to stop the mechanism at various points in the play cycle. This is accomplished by stopping the clock fan, which is easily accessible from the back of the mech. Although the clock fan spins quickly as the mechanism is cycling, the spin doesn’t have any significant force behind it, meaning that you can stop the fan with your finger or a strategically-placed screwdriver. When the fan blade stops, the play cycle is halted until the fan is released.
Now, if you’ve been paying attention, you may have noticed a slight problem. If we want to cycle the mech and stop the fan at the beginning of the play cycle we don’t have enough hands. We need one to hold back the coin detect lever, one to simulate the handle pull, and another to stop the fan. It’s possible to wedge a screwdriver in place to stop the fan, but there is a better way.

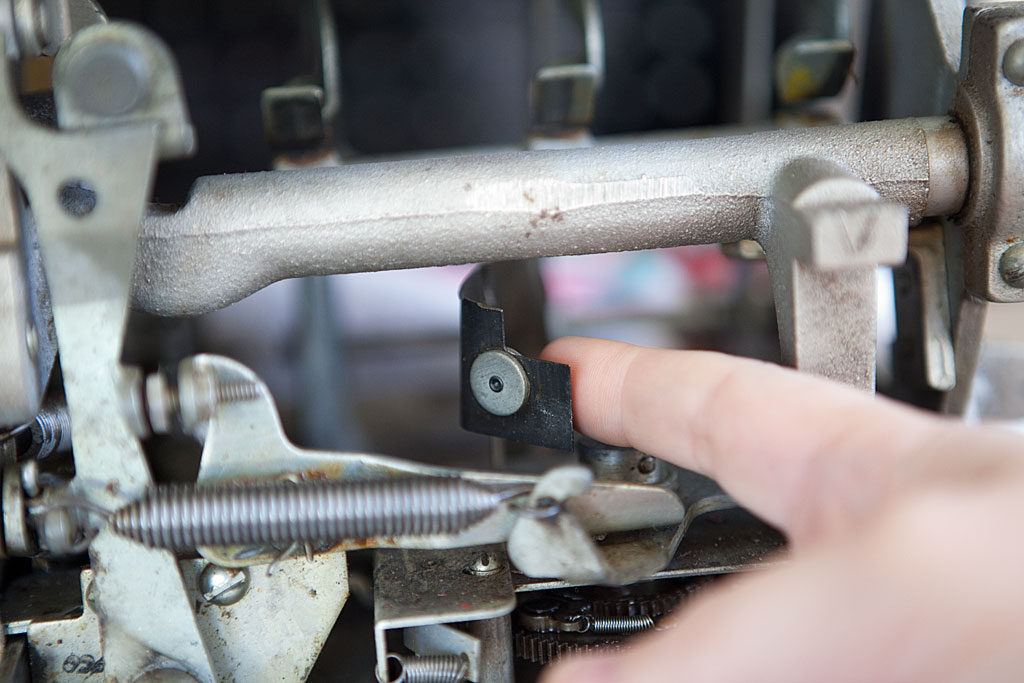
The part above is known as the “Fan Stop Lever” or the “Fan Stop Assembly” and is very frequently missing from antique slot machines. It isn’t critical to the operation of the machine, but it is very handy for working on the mechanism when it is out of the case. Let’s look at the location where this piece is installed.
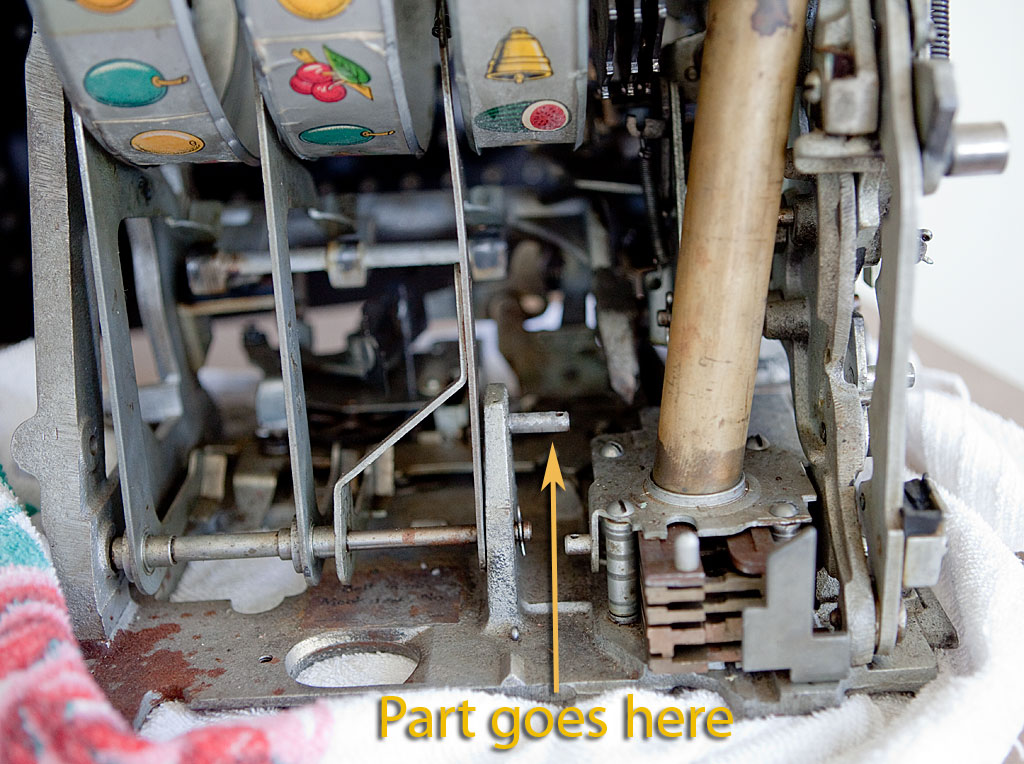
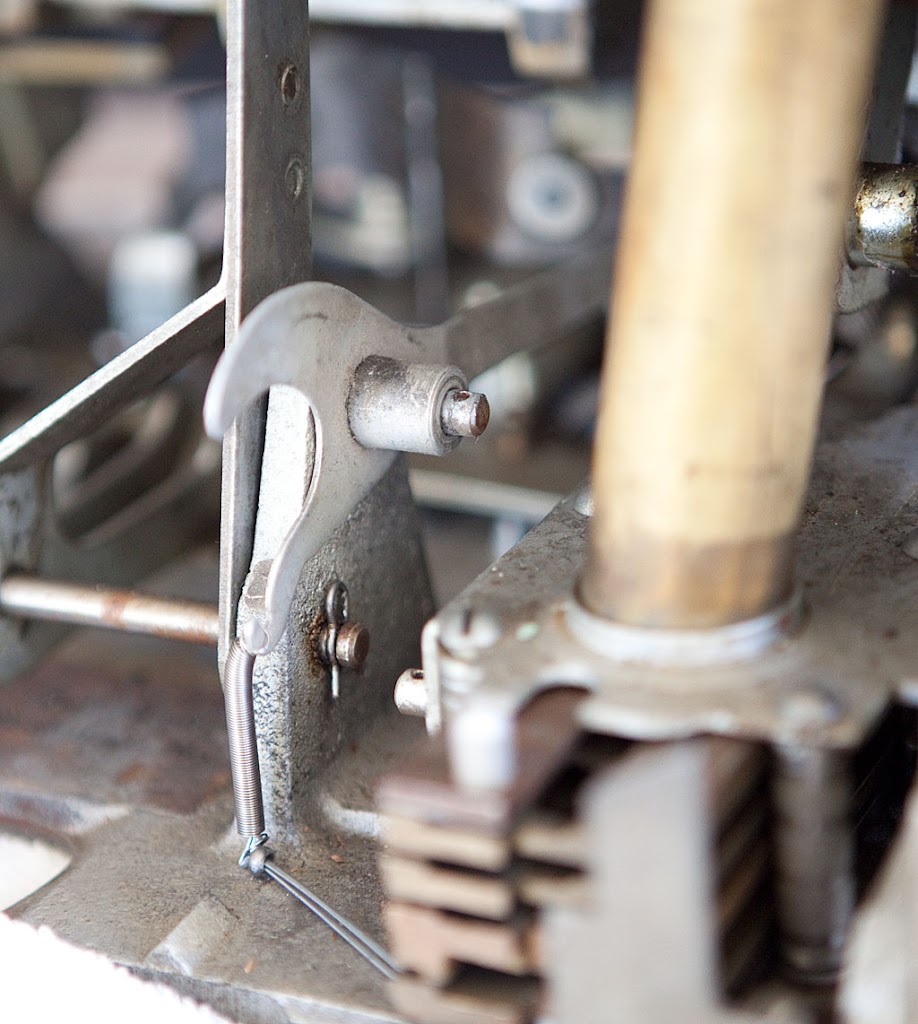
Looking at the front of the mechanism, we can see the post where the Fan Stop Lever is installed. Underneath it you will find a small eyelet where you can attach the related spring. Here’s what the part looks like installed (but without cotter keys installed to keep it in place):
The lever’s purpose is to keep the mech from cycling when the jackpot door is open, but it also prevents operation when the mechanism is not installed in a case by blocking the clock fan. Essentially, the lever is that third hand that I mentioned needing above. With this part installed you can start the mech cycle, then lift the front of this lever whenever you want the cycle to proceed further. If you release the lever, the cycle stops again.
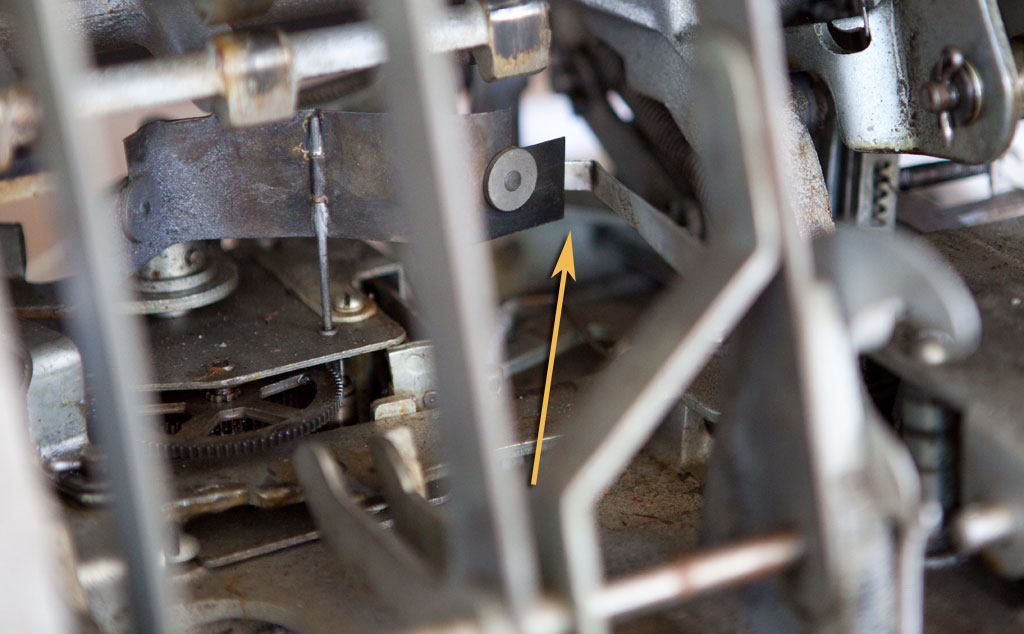
In the photo above, you can see the back of the lever blocking the clock fan. As I mentioned, this part is frequently missing from old machines, and I generally don’t keep one installed on any of the machines I have in my home. I do, however, keep one around and install it temporarily on any mech that requires some work. You can often pick these levers up on eBay for $10-$15, and they are well worth the money.
Well that about does it for cycling the mech. Next time we’ll talk about some of the standard reference materials related to Mills restoration, then we’ll roll up our sleeves and get busy.
Now that I’ve spent some time tinkering with the machine, I’m really anxious to get started on the tear-down. The machine has some potential, and should be a fun machine to play once the restoration is complete.
Let me talk for a minute, however, about the Mills High Top in general. A lot of collectors turn their noses up at the venerable High Top and treat it like a second-class citizen. Their reasoning is that the machine is so plentiful that it isn’t worth collecting. Also, the High Top had so many variations and after-market modifications that it’s difficult to determine exactly what would be considered original.
While all of these points are accurate, I’m a fan of the High Top line of slots. Don’t get me wrong, there are many other machines that I’d like to see drop into my lap, but I think the High Top gets a bad rap. Here are its strong points, particularly from the perspective of a beginning collector:
- The High Top is plentiful, and examples can often be acquired for a reasonably inexpensive price if you are willing to put in some “sweat equity” on a restoration.
- High Top parts are relatively easy to come by.
- The High Top mechanism is very solid.
In addition, since the High Top had so many variations, you don’t have to worry so much about destroying value if you decide to paint the machine in a non-standard color or take some liberties in the restoration.
I consider the Mills High Top to be the “last hurrah” of the purely mechanical slot machines. The Jennings machines started featuring electric lights, and then the electromechanical Bally machines of the 1960s changed the game forever. The High Top belongs to an earlier, simpler age, and that appeals to me.
Anyway, once I acquired the machine featured in this series of articles I started looking for information that would help me nail down as many specifics as possible about the machine. I checked all of the standard reference books, including the following:
Lemons, Cherries and Bell-Fruit-Gum by Richard M. Bueschel
Slot Machine Buyer’s Handbook by David L. Saul and Daniel R. Mead
Collector’s Guide to Vintage Coin Machines by Richard M. Bueschel
Owners Pictorial Guide for the Care and Understanding of the Mills Bell Slot Machine by Robert N. Geddes
Slot Machines of Yesteryear: Operator’s Companion -Mills of the Forties by Dan R. Post
I looked at several other books as well, plus a good many websites, but I ended up finding a photo on page 61 of Collector’s Guide to Vintage Coin Machines that pretty much gave me what I was looking for. I’m not going to scan and post the photo out of respect for the memory of author Dick Bueschel who gave the coin-op collecting hobby so much through his meticulous research, but I’m happy to describe the photo to you. It shows a nickel machine labeled as a “21 Bell” that is pretty much identical to my machine. Bueschel dates the machine to 1949, during the Bell-o-Matic years at the Mills Novelty Company, which looks consistent with the workings of the machine.
Slot Machines of Yesteryear: Operator’s Companion – Mills of the Forties has a couple of ad reprints that show the machine clearly plus some reprints of parts manuals and such. This book and the Mills of the Thirties version are indispensable resources.
I also checked out some of the downloadable documents at Ray’s Antique Slot Machine website, and found some sales literature that shows a slightly different version of the machine.
Other than the small difference in the lower front casting, this machine is a spot-on match.
In their typical ultra-positive marketing language, Mills describes the machine as follows:
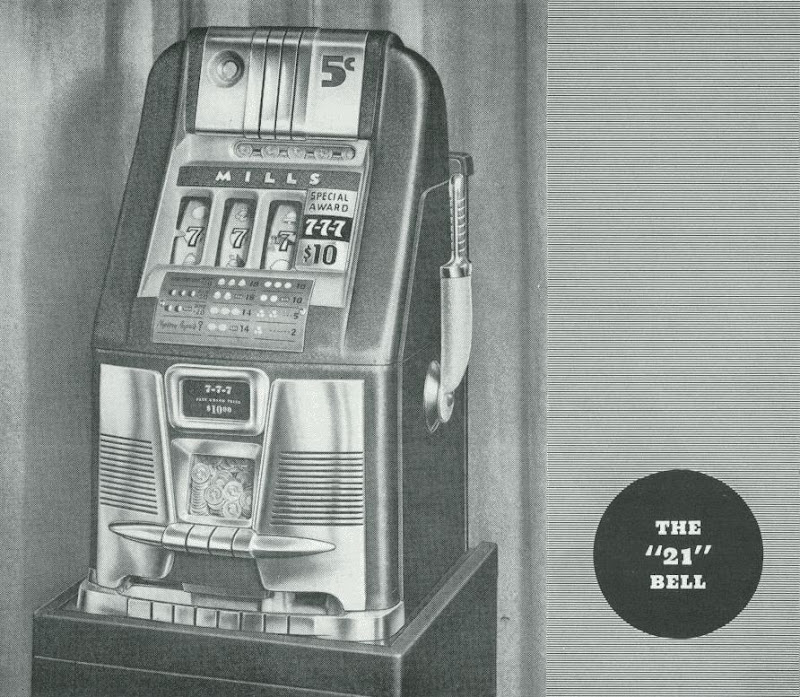
It has tremendous earning power, entirely new award principle, powerful play incentive. “21″ Bell is a completely new innovation of payout awards. It is our answer for the need of a new award principle. It’s a Bell with 10 mystery payouts, a double Jackpot possibility called 7-7-7 and three new ways of winning the Jackpot by the lineup of bars, melons, and a combination of bars and melons. It’s the players’ dream Bell because its idea was created by one of the outstanding Bell operators in the country. Glowing reports about the wonderful earnings of “21″ Bell are coming to us from all over the country. Mills “21″ Bell is now ready for operators and clubs.
5c, 10c, 25c and 50c Denomination
So, considering all of this information I think it’s fair to say that we’ve definitively identified our machine. Personally, I take almost as much pleasure from the hunt for information as I do from the mechanical aspects, and it’s an important step in any restoration. Don’t skip it!
When I brought the slot machine home, I had few things I could do before starting any serious restoration effort. I needed to do some research into the machine itself, but since this is essentially a Mills High Top I was already pretty familiar with it. I definitely wanted to know more about the 777 version, but I’ve got a decent collection of reference material so I didn’t that would be a problem.
Rather than start out with research, I decided to do some tinkering on the machine to figure out why it wasn’t working. Please note that I’m not providing photos for this entry since all of these various parts will be photographed during the tear down, and the following text is more about process than about specifics.
The machine had a few problems that were evident when I bought it. Quarters had jammed in the escalator, which is usually a sign of some other problem deeper in the mech. When I tried to cycle the mechanism, only the third reel would spin more than a very small amount, and it was pretty sluggish. If I manually set the reels to a payout condition (three oranges, two cherries or whatever) no payout would occur. The mech cycle sounded basically right, and the clock appeared to be working fine, but the reels were going nowhere.
Now, since I’d already decided to do a ground-up restoration on this slot machine, some of you are probably wondering “Why mess with the little stuff now? Just tear the whole thing down and be done with it.” This is a valid way of thinking, but non-working slot machines are like magnets to me. I just can’t stay away from them. Plus, I really felt like this machine was close to working, and I wanted validation that my money had been well spent.
So, I got out the tools and started looking the mechanism over.
First, I took a stab at the escalator. I cleared all the coins out, worked the mechanism a bit to loosen it up, and put a small amount of oil in the proper places. At this point, we’re going to take a break and talk about oil and slot machines. Believe it or not, there’s a bit of controversy here. Read on.
 Ok, so everyone loves WD-40. I’ll bet you have a can in your house right now, and that’s a good thing. WD-40 is handy stuff and is useful for a variety of purposes. Some people believe that it’s good for lubricating slot machines. I am not one of those people.
WD-40 has several uses named by the manufacturer. I quote: “WD-40 cleans/degreases, penetrates to loosen up stuck parts, prevents corrosion and is a light lubricant.” Notice that “light lubricant” is the last item listed, implying that the other jobs are more important. The WD-40 faq also mentions that WD-40 remains effective after it dries… but drying is the dead last thing you want from anything that should be lubricating your slot machine. In my experience, WD-40 is useful as a penetrating oil, allowing you to get parts unfrozen and stuck screws out of a mech, but using it as your primary lubricant will give you problems down the road since the mech tends to “gum up” and get sluggish. Also, spraying any sort of oil in your machine is likely to dirty up your reel strips, which you certainly don’t want. In short, I’d recommend that you not use WD-40 on a slot machine except as a penetrating solvent to loosen rusty parts and/or screws.
Another product manufactured by the WD-40 company is suited to the lubrication task at hand, however, and that’s good old 3-in-1 Oil. Some people swear by sewing machine oil, but I’ve had good results with 3-in-1.
None of these products, however, will suffice for parts where metal-on-metal friction is taking place. For those parts we’ll need a good grease, but we’ll get to that later.
Anyway, back to our slot machine. After I cleared the coins out the escalator, oiled it a bit and took it through a couple of cycles, it loosened up and appeared to work pretty well. Good news… one problem down. The escalator still needs a complete and thorough cleaning, but it looks to be fundamentally sound.
Next, I wanted to see if I could get all of the reels spinning. I noticed that the mech was making an odd “clang” sound when I cycled it, just when it should be kicking the reels into motion. As it turns out, the “kicker” was the problem. The kicker is the part of the slot machine that “kicks” the underside of the payout disks into motion, then gets out of the way and lets them (and the reels) spin. My kicker, however, was not getting out of the way and was ringing one of the payout disks like a gong.
Again, the problem appeared to be related to a dirty and gummed-up mech, so I mentally blamed WD-40 again, got out the 3-in-1 and spent a bit of time working the kicker back and forth until it freed up.
Now, when I cycled the mech all three reels spun at a good clip! So much for problem number two.
The last obvious problem was that the machine would not pay out. I checked the payout slides and found them frozen. This time 3-in-1 won’t help us, since you should never put any lubricant on payout slides. Doing so tends to make the coins stick together, and that leads to other problems. Now, based upon the photos I posted in our last chapter, we already know that there is rust on and around the payout slides, so they definitely need attention. As an experiment, I manually worked the slides back and forth and did the same thing to the horizontal payout fingers. After a bit of time, I got things moving and the machine started paying off! Most of the payouts were the correct number of coins, but for some reason none of the payouts involving oranges were working at all. I spent some more time working with the slides, and they eventually started working as well.
At this point, the machine works almost perfectly, at least for the parts that are present. It accepts coins, marches them across the escalator, cycles the mech, spins/stops the reels, and pays off in correct increments. The escalator doesn’t always reset as it should, but a couple of pulls on the handle set things right. That’s a small problem that will probably work itself out after everything is cleaned and re-lubricated.
So what did I accomplish? I got the machine working and confirmed that the mechanism is basically solid. By far the largest problem that the machine has is simple neglect, and we’ll be able to cure that with some TLC and WD-40.
(Just kidding about that last part.) ![]()
Now that we understand why we are here, let’s take a look at what we have to work with.
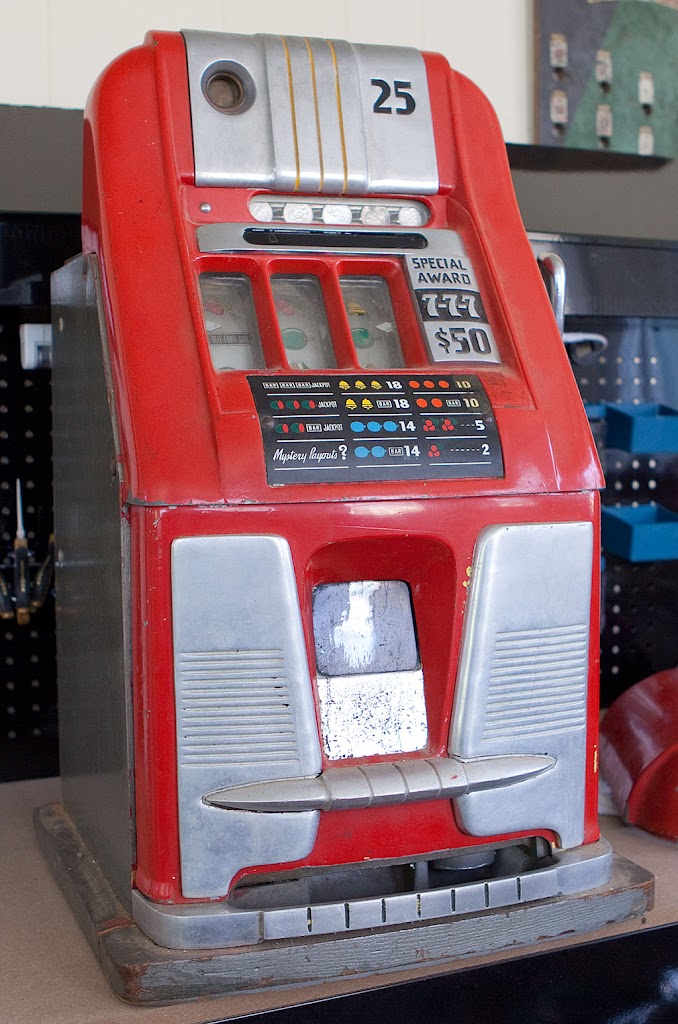
The machine is obviously a Mills High Top, although it has a strange name badge with no name. It’s got some of the trappings of a “21 Bell”, sometimes referred to as a 7-7-7, although it has definitely undergone some changes and a good bit of neglect during its life.

When we look at the side we see that the handle is in good shape, but that the sides have been painted grey (always a bad sign.) One of the absolute laws of slot machine restoration is “Grey paint never covers up anything good.”
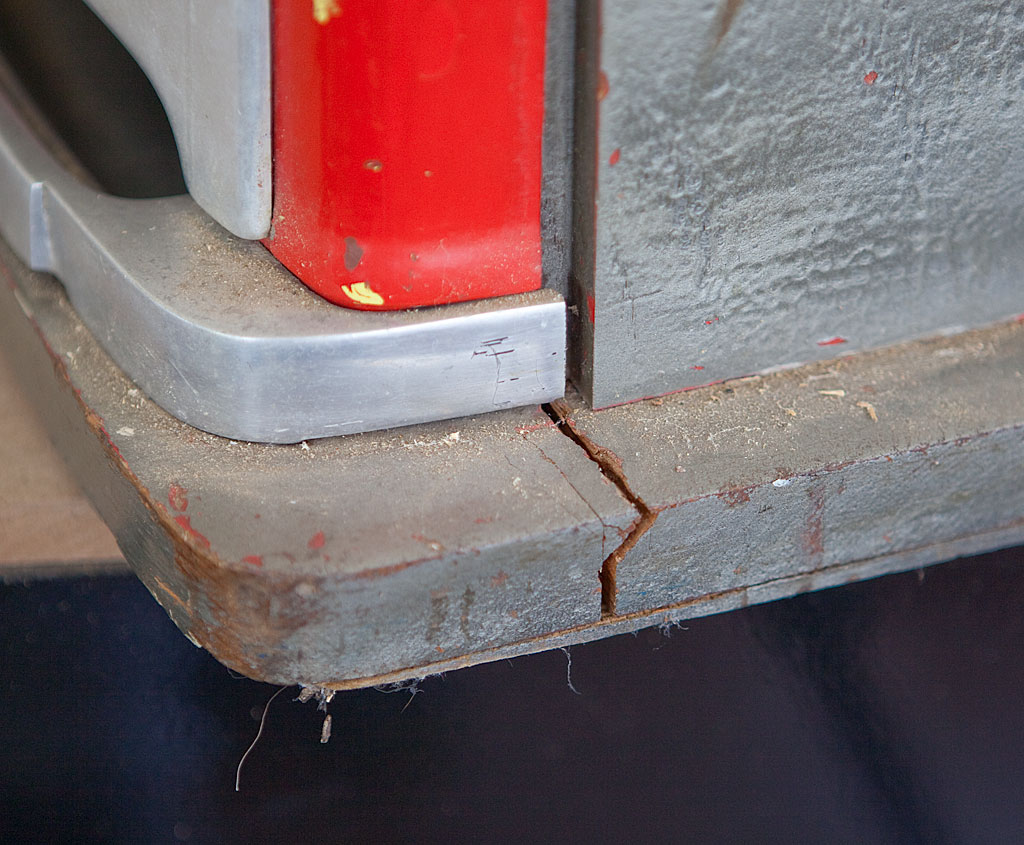
If we take a closer look at the base, we can see that the wood is starting to separate. This will have to be stripped, sanded and glued back together, assuming that it is salvageable.
The window covering the jackpot area is pretty rough. First off, it is upside down. The silvered area is meant to cover the reserve jackpot, which would be at the top. The clear area is covered partially with black paint, probably to hide the fact that the jackpot was non-functional. More about that later.

Here’s a view inside the cabinet with the mechanism removed. The jackpot housing is there, but all of the important mechanical parts are missing (of course.) Jackpots are a little complicated to maintain, and a lot of people over the years have either removed them or lost key parts.
We can also see that there is no Gold Award mechanism present. We’ll have to do something about that later if we want this slot to be a reasonable rendition of a 7-7-7 machine.
There’s a lot more silver paint inside of the cabinet, and a couple of cabinet pieces are missing.

Here’s a close-up of the escalator, which appears to be in decent shape. All the critical parts are present, if a bit dirty.
In all these photos I’ve shown you the machine with the back bonnet and door removed. Let’s take a look at the reason why.
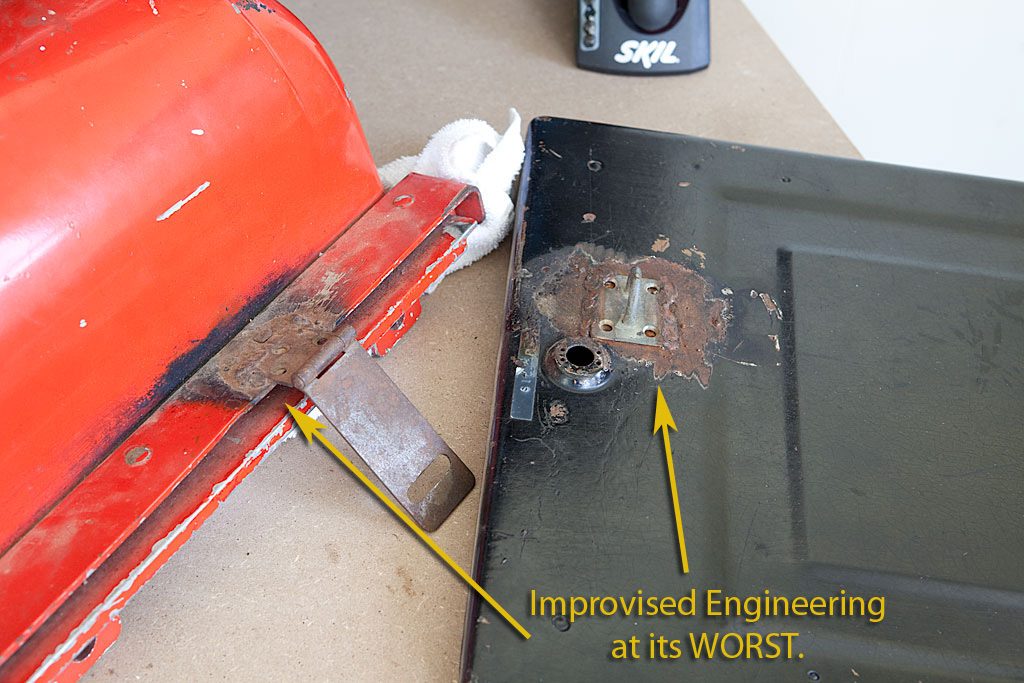
Wow.
Whoever did this has earned a permanent home in Slot Restoration Hell. Hey, I know that it can be tough to find an original lock or a suitable replacement, but was WELDING this junk to the back bonnet and rear door really the best solution you could come up with? Really?
Sometimes I just do not know what people are thinking.
Anyway, we’ll have to resolve this situation later. I’m hoping that I can grind off the welds and salvage both the door and the bonnet, but time will tell. Replacements for both are readily available, but I’d prefer not to go that route unless it is absolutely necessary.
Here’s a tip for everyone: If your restoration or repair strategy for an antique slot machine involves welding, you should probably stop and ask someone first. Had this been a very rare variety of machine the above procedure would have destroyed a ton of value.
Let’s move on to the mech itself.
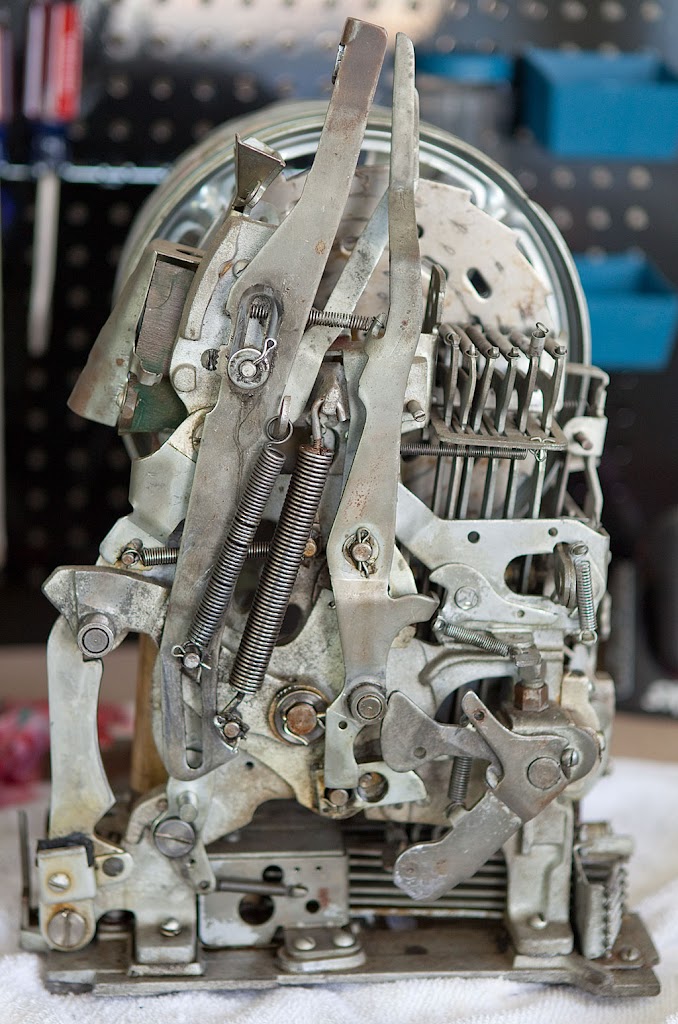
This really doesn’t look too bad. The brake wires are missing, as is the extra operating spring, but none of those things are critical to basic operation and are often missing on old machines. The clock looks grimy but solid.
On the A-frame we can see more grey paint, but otherwise everything looks pretty good. There’s a ton of old grease and grime, but we’ve already established that the whole machine needs a good bath, so that’s no surprise.
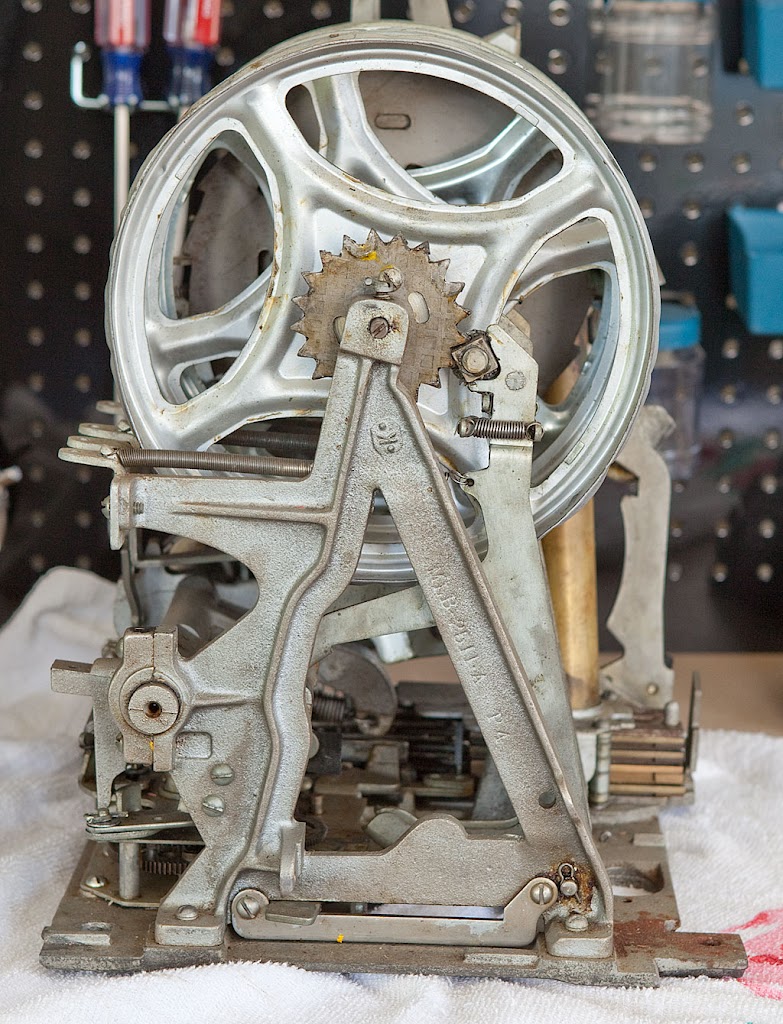
On the other side of the mech we find some traces of rust and more grey paint, but again the critical parts are present.
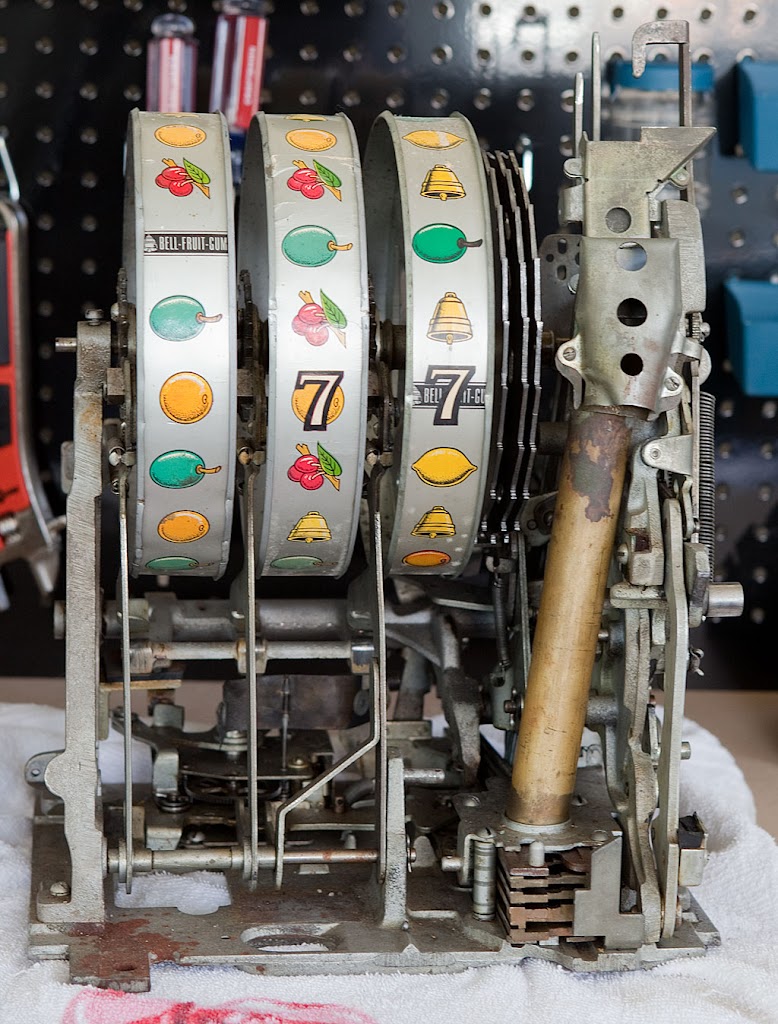
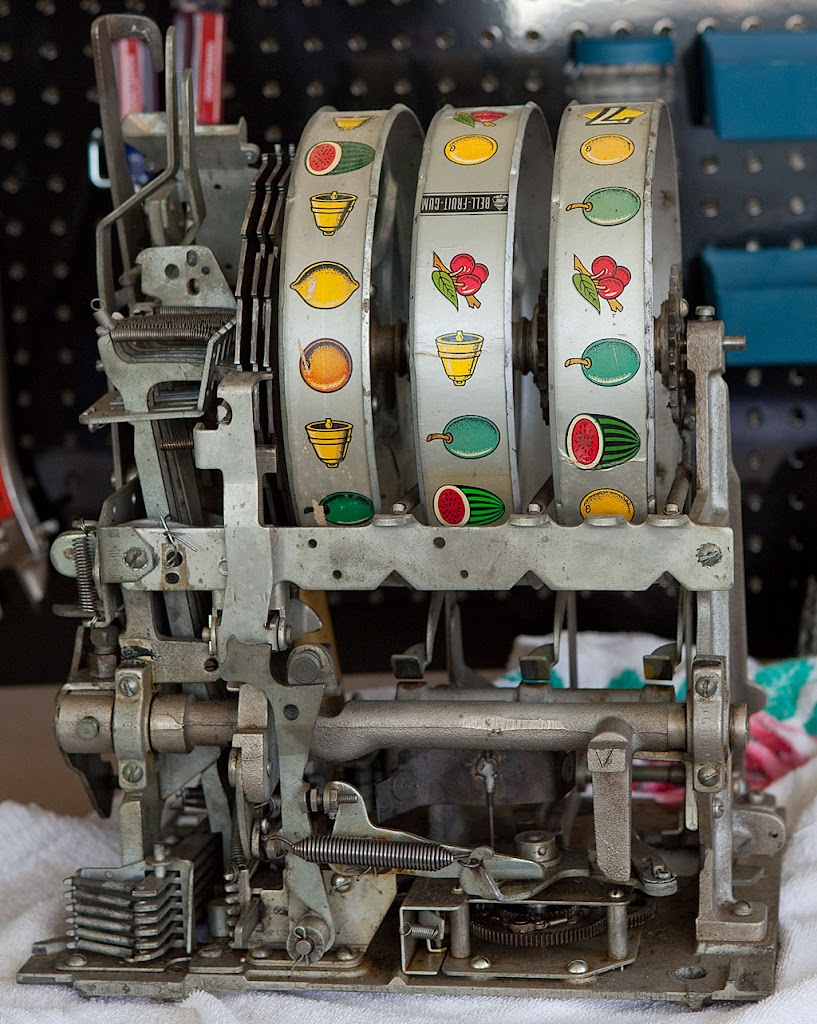
The front of the mech confirms a few things. First, the reel strips need to be replaced. They’ve been spliced at several points and are just generally grungy. The more interesting things are down low, however, so let’s take a closer look.
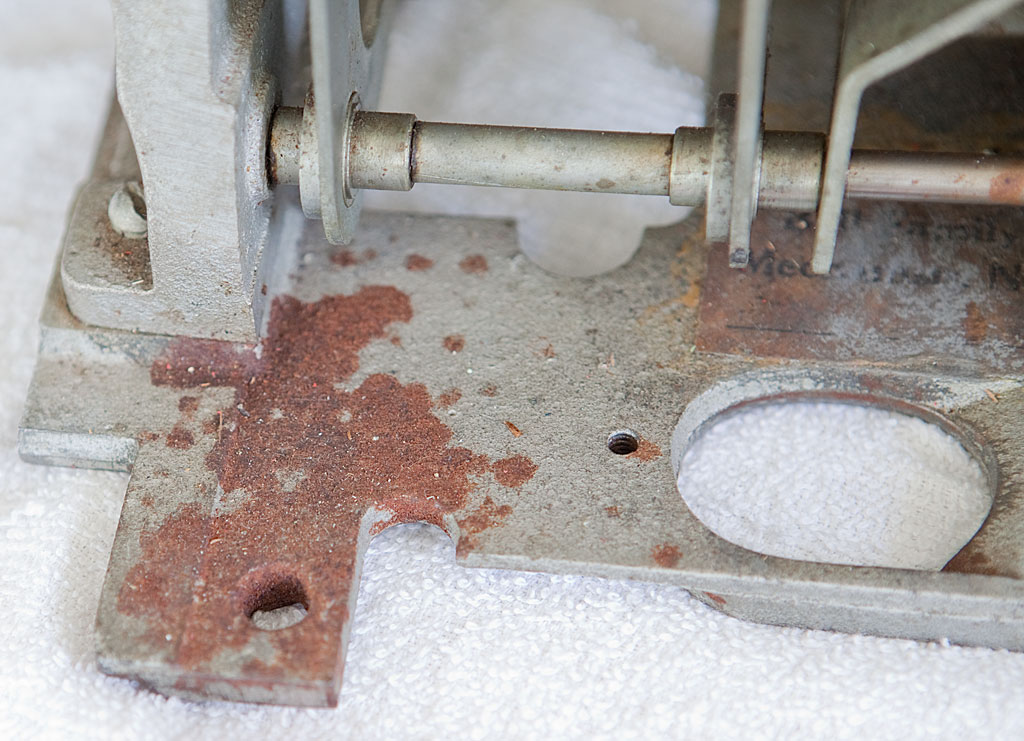
Now the story is coming into focus. At some point someone thought that a coat of grey paint constituted a restoration, which is obviously not the case. We can see the active rust growing despite the paint job, so we know that the base plate will have to be stripped and/or blasted, and probably hit with a wire wheel to get rid of all the rust. Some of the shafts and other parts are showing signs of rust as well.
In the above photo you can also see the remnants of the original label which would have contained the serial number. I’d love to have that just so that the machine could be dated definitively, but as you can see it’s in rough shape. It’s faded and covered in oil and paint. When I tear the mechanism down I’ll see if there is any way to read the number, but I don’t have high hopes.
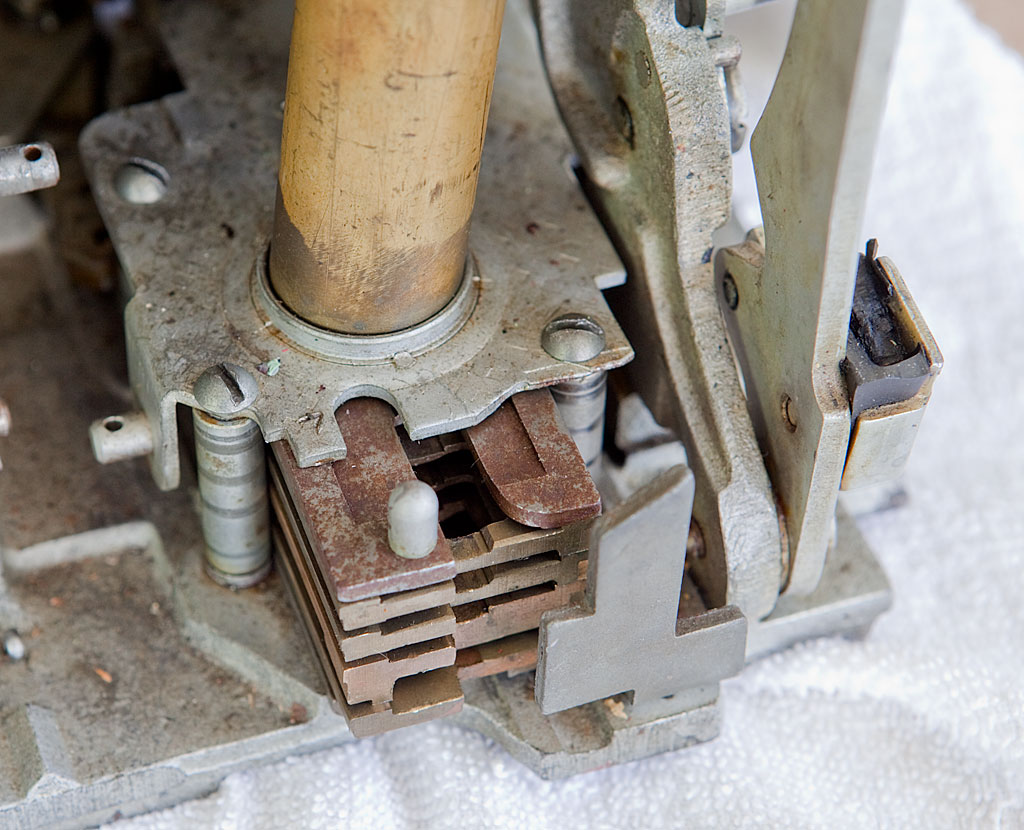
Here’s a cause for greater concern. It’s very obvious that the top payout slide has significant rust. Since the payout slides are designed to work with no lubrication, this is not a good thing. These slides will definitely need some attention.
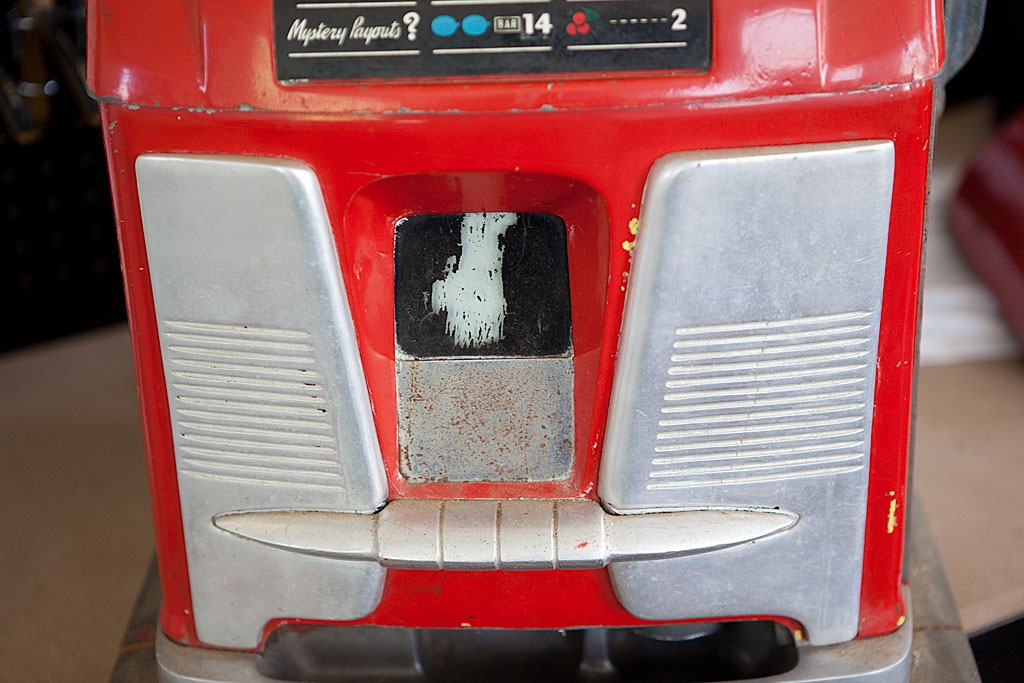
We can also see that the rubber bumper on the far right is literally disintegrating and will need to be replaced, which will probably be a recurring theme as we get deeper into the mech.
Well, that’s about the size of it. There’s a lot of work ahead, but in general we’re in OK shape. The mechanism and cabinets are mostly complete, and a good many of the machine’s operating problems can likely be resolved by a good cleaning. It isn’t the best machine in the world, but it is far from the worst.
A while back I acquired a Mills High Top antique slot machine from a local seller that I found through Craigslist. The machine was not functioning, but appeared to be reasonably complete. The price was right, so I bought the machine and brought it home.
I’ve worked on several slot machines in the past, but this will be my first complete tear-down and ground-up restoration. I decided that documenting the process would be a good exercise for me and might prove valuable to other collectors contemplating a similar restoration, so I built this blog to serve as my restoration diary.
Hopefully the end result will be an attractive and fully-functional slot machine. Resurrecting an old, neglected coin-0p of any variety can be a very fulfilling experience. I’m not undertaking this restoration with the expectation of selling the machine, nor am I trying to make every part on the machine look brand new. My intention is to do a thorough and fundamentally sound job on the mechanism and an attractive restoration of the exterior.
One caveat, however: I’m in no hurry. I’m going to be tackling this project bit by bit as time permits, and I have no deadlines to meet, so the restoration may take a while.